
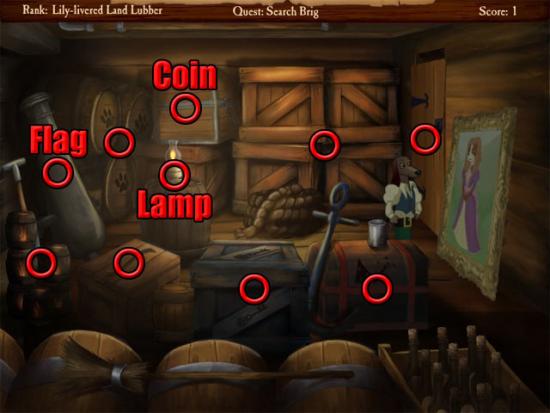
The game starts in the brig. Say “I'll never join your crew!” to Captain
Howell. After he leaves, select the ten hotspots shown below:
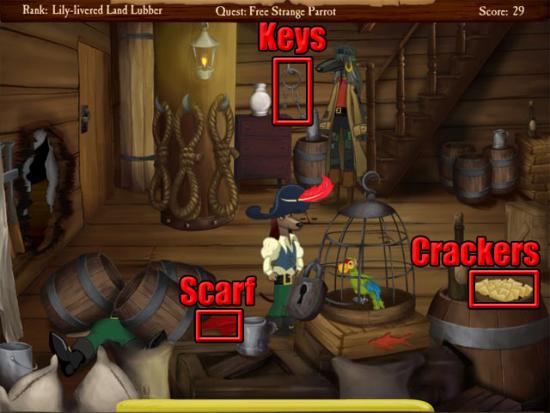
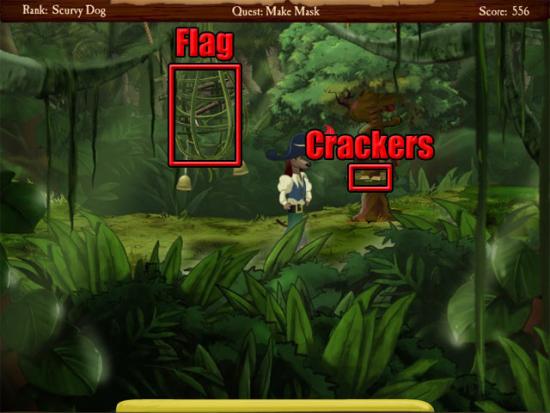
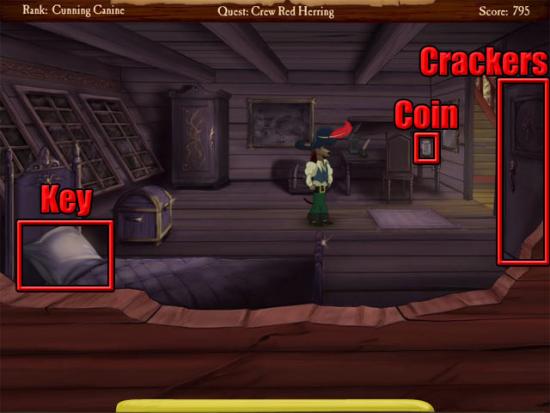
Select any two topics when talking to Melvin. When he asks where the
situation reminds him of, say “I have no idea!”. Take the scarf, the keys and
the crackers:
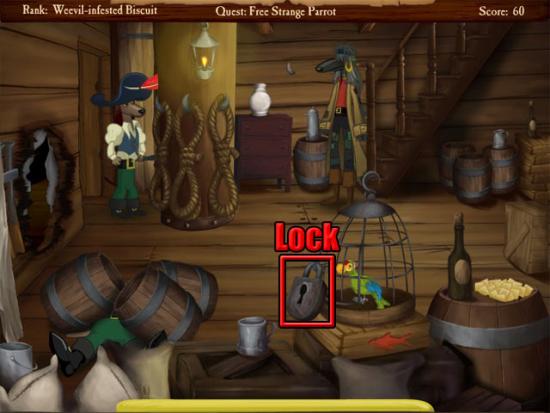
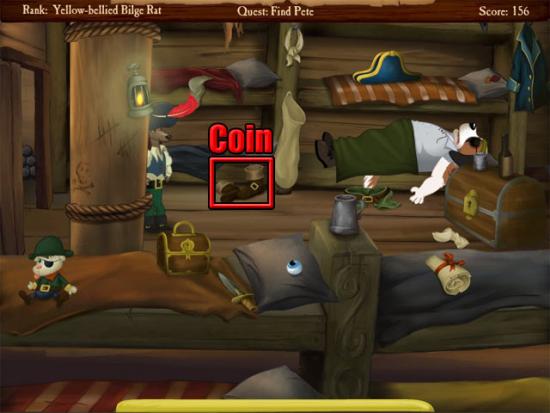
Use the keys with the brig door. Enter the brig and take the lamp on top
of the barrel. Return to the hold. Combine the scarf with the whale oil lamp
in the inventory to make the oily scarf. Use the oily scarf with the rusty
lock on the parrot cage:
Use the keys with the oiled lock to receive the parrot. Use the parrot with Rover to talk to him. You can talk to the parrot at any time throughout the game to ask for general help about the current task or more detailed hints which cost a cracker. Talk to Melvin and select Port Sickle, 10 days and swabbin' the decks in silk dresses as the answers to his questions.
Walk upstairs to the lower deck and talk to Melvin about the hatch, and
then select any reason to see him knock on the hatch in a certain way. Select
the hatch and knock in the same way that Melvin did to talk to Bobby. Ask to
come up and switch places, and Bobby will tell Rover to find Pete. Walk west
to the galley. The following hotspots are available:
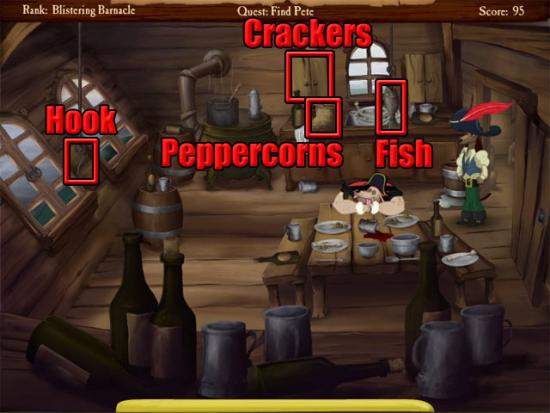
Take the dried fish and the peppercorns. Open the left cupboard to take
the crackers. Use the dried fish with the hook. Use the oily scarf with the
left window. Open the window and the chef will spill some rum on the floor.
Use the peppercorns with the spilled rum. Open the left window again and this
time the chef will drop his bottle of rum on the floor. Take the bottle of
rum. Return to the lower deck and walk east to the sleeping quarters. Take
the piece of eight from the boots:
Select Pete and he will ask for Rum. Use the bottle of rum with Pete. Return to the lower deck and knock on the hatch in the same way that you did earlier. Tell Bobby that Pete is drunk to go up on deck.
Walk west to the town street and then continue west to the front of the
Stumble Inn. Select the barrels for crackers and a piece of eight:
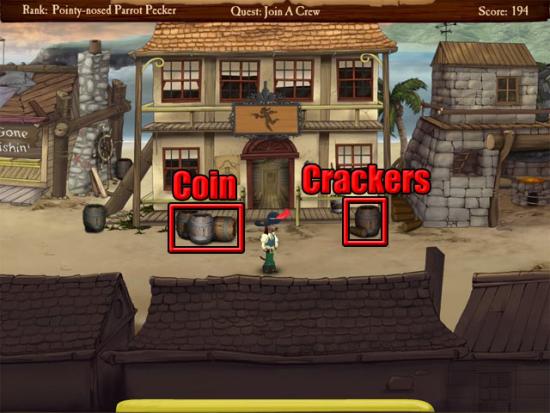
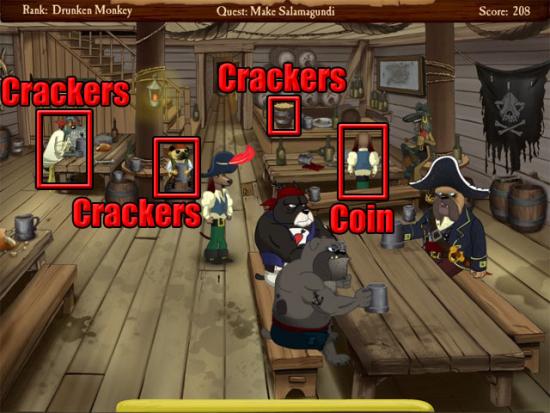
Enter the Stumble Inn. Talk to Howell about joining his crew and then
select any topic to learn that he wants Rover to make Salamagundi. Talk to
the insane pirate and Puggy to receive to receive some crackers. Select the
bucket for more crackers. Talk to Davey about the hat being a family
heirloom, and then offer to buy him a new hat to receive a piece of eight:
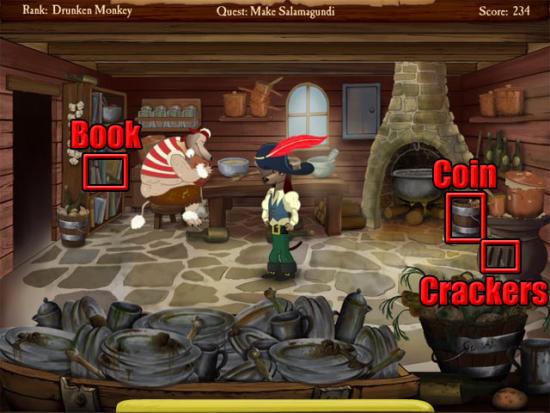
Enter the kitchen and select the cook book to receive the Ron Copper
quest. Take the crackers from the stove and piece of eight from the bucket:
Exit the Stumble Inn and walk west to Turtle Beach. Walk up the path at
the left side of the cliff to see the cliff shack. Walk west and talk to Ron
about the recipe for Salamagundi. Return to the beach and take the fishing
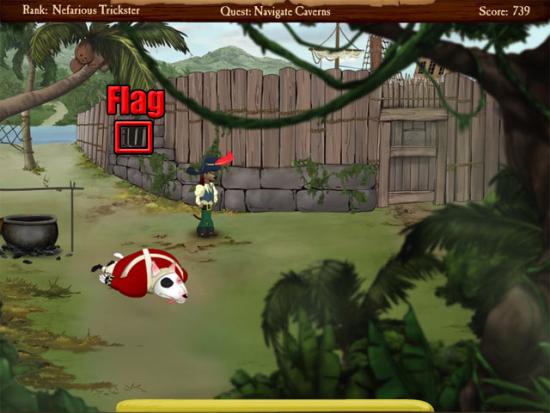
net. Select the sand mound twice to receive two eggs and a flag piece:

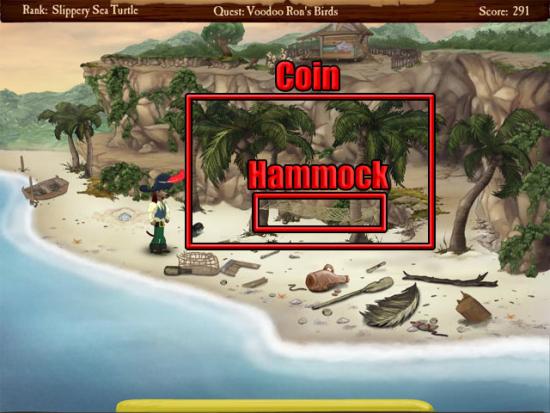
Use the fishing net with the palm trees to create the hammock. Use the
hammock to land next to Ron. Talk to Ron to receive the voodoo book and cheat
sheet. Use the voodoo book on Rover to learn that food that the animal eats
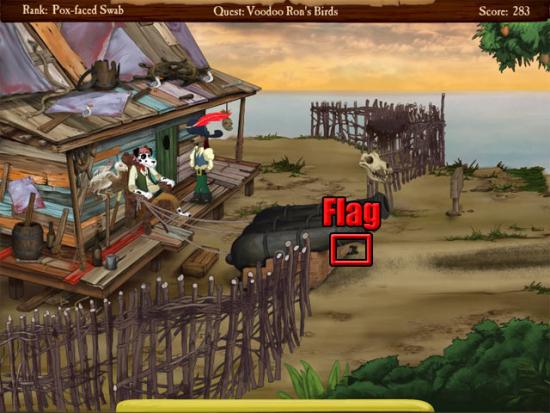
needs to be found before the spell can be performed. Select the cannons for a
flag piece:
Return to the beach and take the hammock. Select the palm trees for a
piece of eight:
Walk east to Town Street and ask Scruffy about what he is selling. Keep
talking to him until he agrees to trade the fish for the net. Return to the
cliff shack and use the voodoo book on Rover to see the spell for scaring
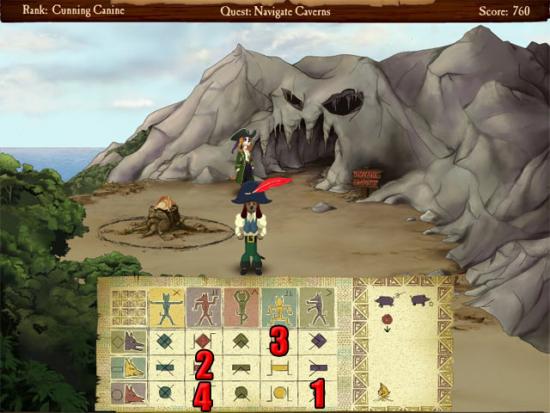
beasts. Exit the view of the book and use the voodoo cheat sheet on Rover.
Press the symbols in the following order:
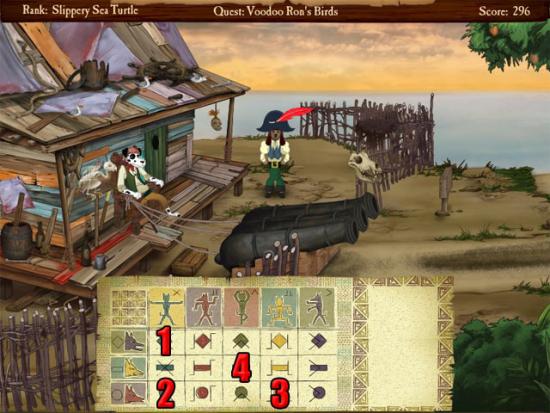
While Rover is glowing red, use the pickled herring with one of the birds
on the roof to scare them away. Talk to Ron about the spell to receive the
Salamagundi recipe. Use the recipe with Rover to read it. Talk to Ron again
and ask him about the spices to receive the bag of spices. Walk east to see a
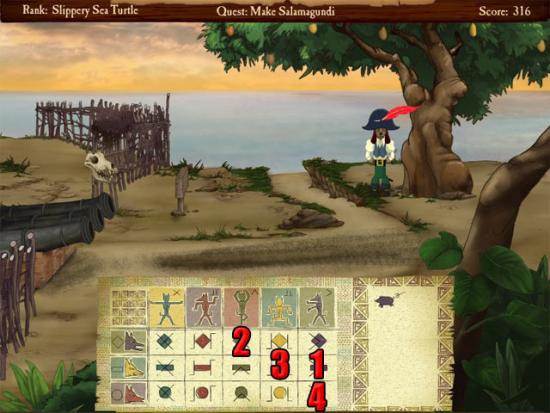
monkey performing a spell. Select the tree to knock on it three times. Use
the voodoo cheat sheet on Rover and press the symbols in the following order:
Take the mango on the ground near the tree. Return to the kitchen in the
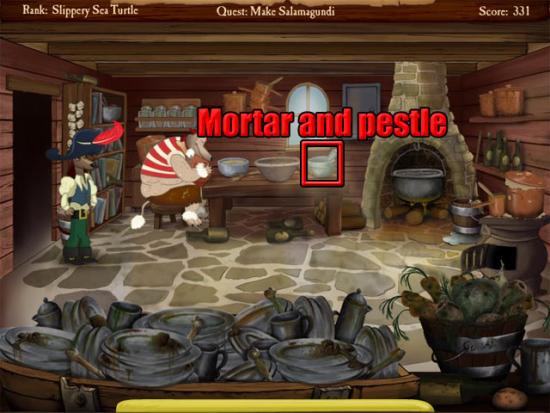
Stumble Inn. Use the peppercorns with the mortar and pestle on the table to
make the pepper:
Use the pepper with the chef and he will drop the ham onto the floor. Take
the ham. Return to the fort and knock on the tree at the right side of the
guard. Use the voodoo cheat sheet on Rover and cast the drop fruit spell.
Enter the fort. Select the candle to unlock the cabinet. Open the cabinet to
find a flag piece and a piece of eight. Take a bottle of wine from the wine
rack:
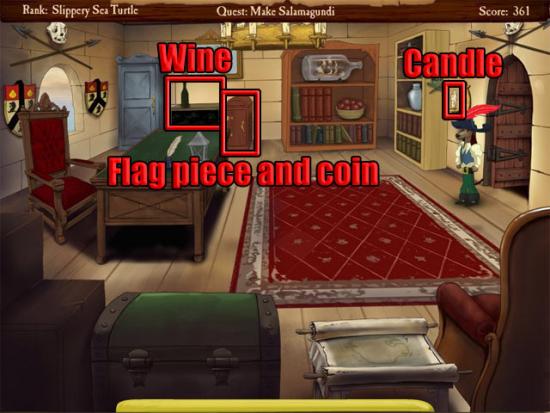
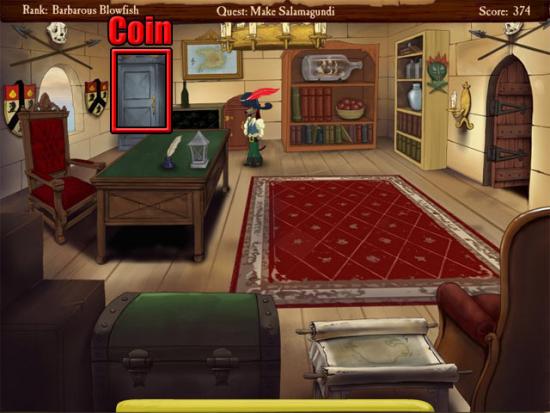
Rover will hear someone approaching the room, so select the blue cupboard
to hide. After the conversation, open the cupboard to find a piece of eight:
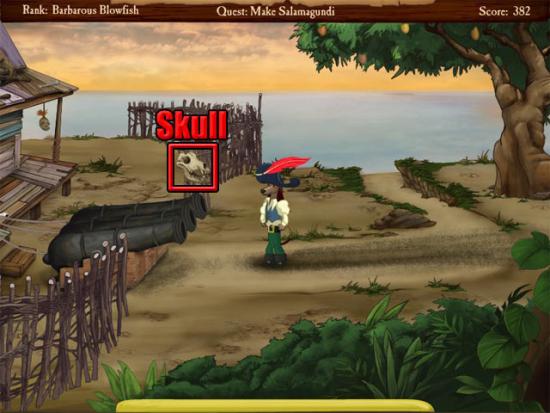
Return to the cliff shack and use the wine bottle with the skull:
Return to the kitchen in the Stumble Inn and use the turtle eggs with the cauldron to boil them. Use the mango, boiled eggs, ham, pickled herring, uncorked wine and spices with the mixing bowl on the table to make Salamagundi.
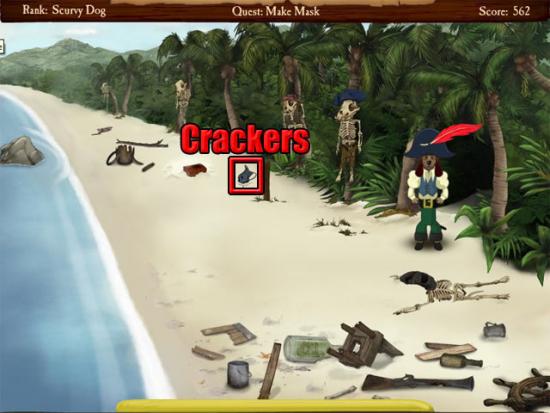
Select the mound and the skeleton with the blue hat to find two pieces of
eight and select the note to find crackers. Take the skull:
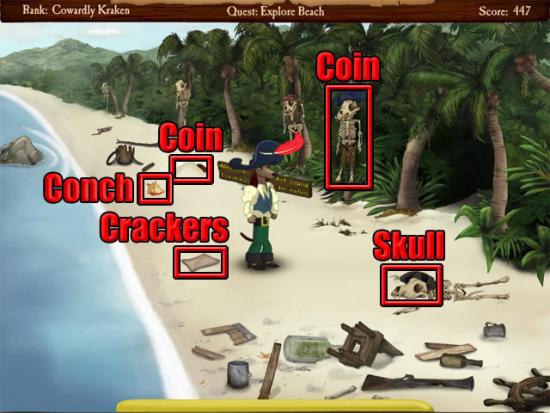
Try to take the conch to get snapped at by the crab. Use the skull with
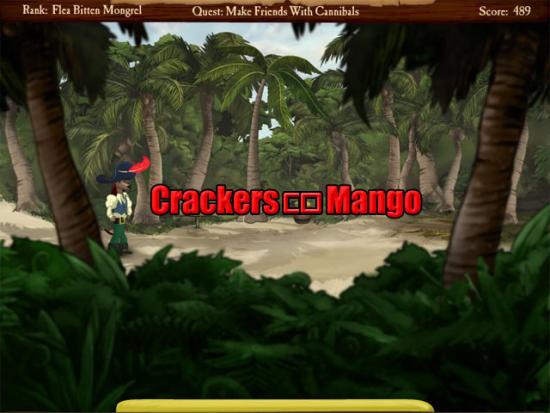
the conch. Take the conch. Enter the jungle and take the crackers, mango and
the barrel:
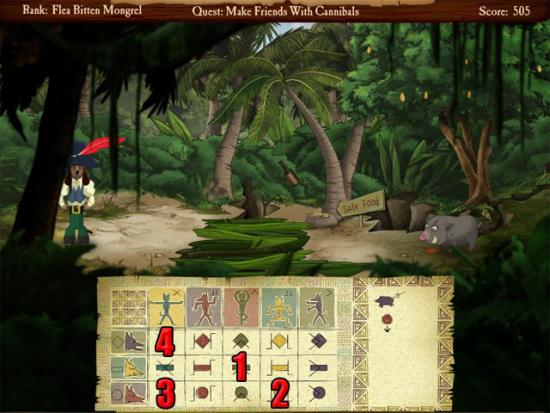
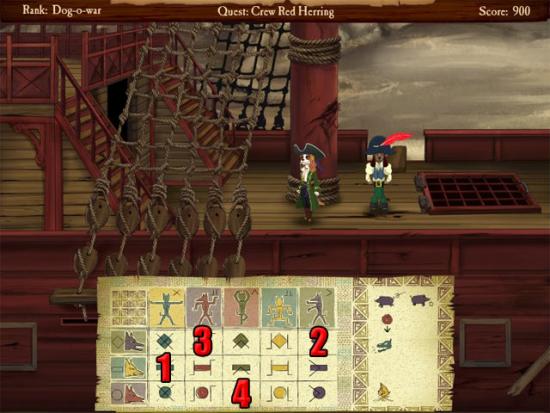
Walk east to the next area of the jungle. Use the voodoo cheat sheet on
Rover and press the symbols in the following order to cast the lure beasts
spell:
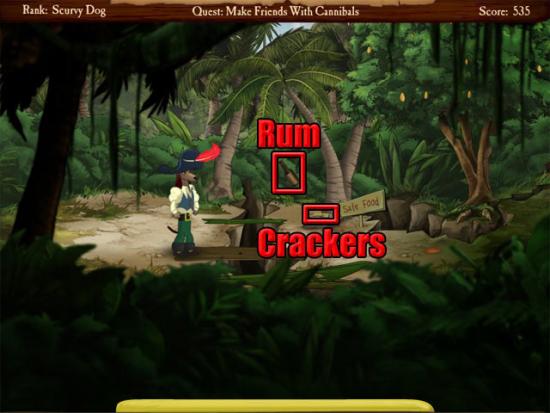
While Rover is glowing red, use the mango with the pig and it will fall
into the trap. Walk west to the previous area of the jungle and take the
barrel. Walk west to the beach and take the sign. Walk east twice to the
jungle and use the cannibal sign with the hole to create a bridge. Take the
rum and the crackers:
Walk east to the next area of the jungle. Use the voodoo cheat sheet on
Rover and cast the scare beast spell, then use the mango with the pig to
scare it away. Walk across the obvious trap and wait for the two dogs to
leave. Take the flag from the trap and the crackers in front of the tree:
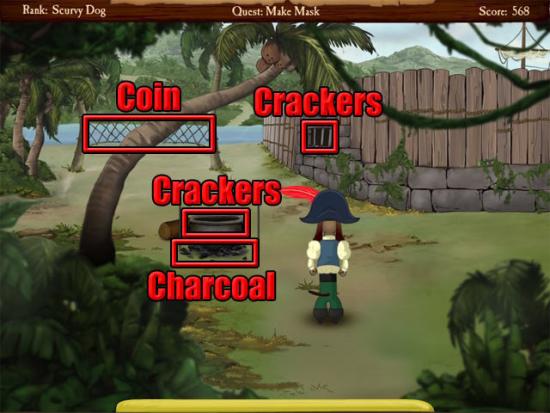
Walk west three times to return to the beach. Select the jug for crackers:
Walk east four times to the cannibal camp. Select the cauldron and the
bars for crackers. Select the net twice for a piece of eight. Take the
charcoal below the cauldron:
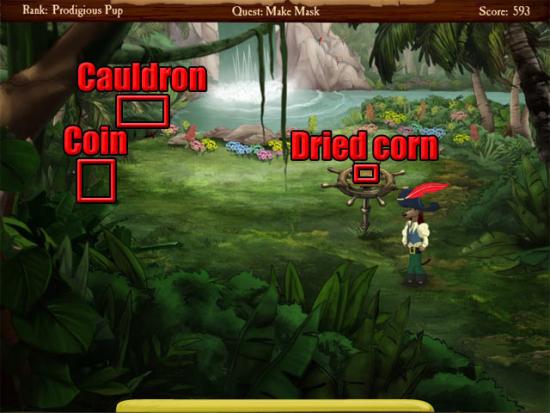
Walk west to the waterfall. Take the dried corn on the bird feeder. Select
the two plants at the left side of the area to find a piece of eight and a
cauldron:
Use the mango and the rum with the cauldron. Examine the cauldron to see
four symbols. Exit the view of the cauldron. Use the voodoo cheat sheet with
Rover and select the symbols in the following order to cast the heat iron
spell:

Select the heated cauldron to take the mango jam. Use the mango jam with the bird feeder. Exit the area and then return to it to see feathers on the bird feeder. Select the bird feeder to take the feathers. Return to the camp to see the two dogs knock on the door in a certain way. If you need to see the knock again, just exit the camp and return to it.
Combine the charcoal with the barrel in the inventory. Combine the sticky
feathers with the barrel in the inventory to make the tribal mask. Use the
tribal mask with Rover. Select the door and copy the knock that was just
heard. Answer “Julie Rover” when asked for a name, then mention the mask to
enter the blockade. After the cutscene, keep walking through the exits until
Rover leaves the cave. Select the sign twice for a piece of
eight:
Return to the camp to talk to Howell behind the bars. Keep talking to him
to start the Free Captains quest. Use the dried corn with the cauldron, then
use the voodoo cheat sheet on Rover and cast the heat iron spell. Exit the
conversation with Rufus. Select the palm tree to knock on it, then use the
voodoo cheat sheet on Rover to cast the drop fruit spell. Select Rufus to
take the keys and free the captains from the jail. Select the bars to take a
flag piece:
Return to the beach and select the water for a flag piece:
Return to the waterfall and select the dried corn for some crackers:
Return to the caverns. Combine the rum with the conch in the inventory.
Use the gunpowder and the conch with the stump. Use the voodoo cheat sheet on
Rover and select the symbols in the following order to cast the voices of the
dead spell:
Enter the caverns and use the magic conch on the correct exit to hear a voice repeat part of a song. Go through the exit and the use the magic conch on all of the exits until you hear a voice repeat a longer section of the song. Keep doing this in all of the rooms in the maze until the ship is reached.
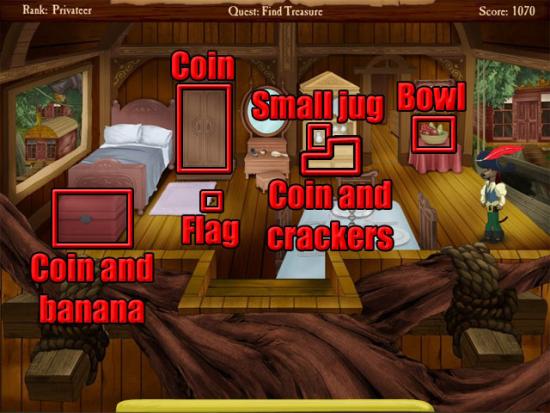
Enter the cabin. Move the pillow on the bed to find a small key. Select
the jar on the desk to find a piece of eight. Select the jar again to take
it. Open the wardrobe to find crackers:
Use the small key with the cupboard to take a piece of eight and a large
key. Use the large key with the left chest to take a piece of eight and
Silvereye's cutlass. Combine the large key with the small key in the
inventory to make the super key. Use the super key with the right chest to
take compass 1 and an old book. Return to the cannibal camp and walk west to
the waterfall. Use the empty jar with the cauldron to find a flag piece. Use
the jar with the waterfall to fill it with water. Return to the Red Herring
and use the jar with ingredients on Clara. Combine the gunpowder and the rum
on the jar with ingredients in the inventory. Use the jar with ingredients on
the hatch. Use the voodoo cheat sheet with Rover and select the following
symbols to cast the raise dead spell:
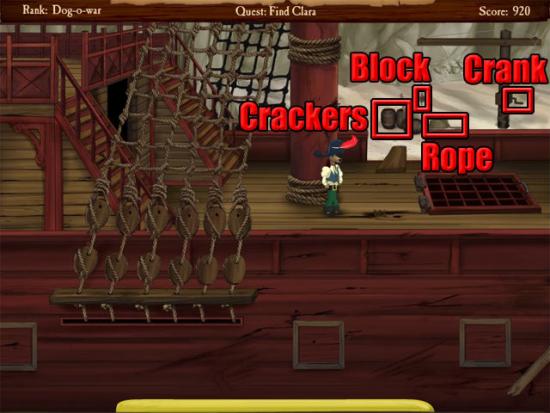
Take the crackers from the barrels. Take the block, rope and crank:
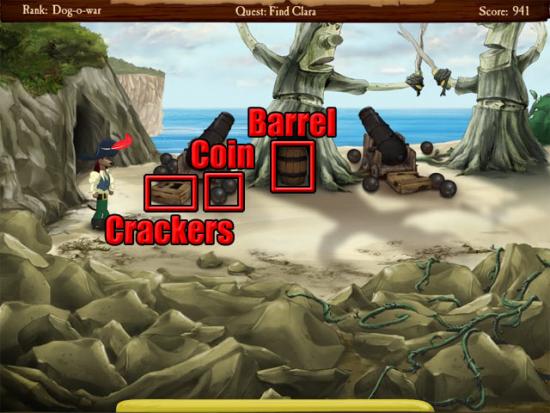
Walk west to the cove and east to the lookout point. Take the crackers
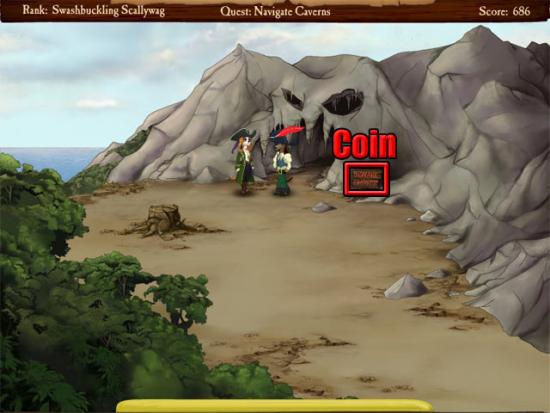
from the crate, the coin from the cannonballs and the barrel from the tree:
The barrel will not be removed from the tree but can still be selected
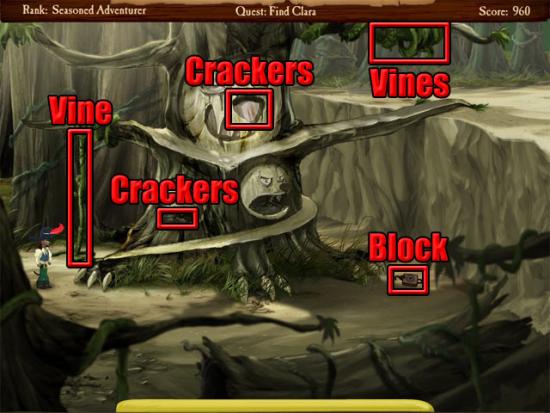
from the inventory. Walk east to the forest. Use the cutlass with the vine at
the left side of the tree. Take the two sets of crackers and the block:
Combine one of the blocks with the rope in the inventory. Combine the
block and rope with the remaining block to make the block and tackle. Use the
block and tackle with the vines on the right branch. Use the barrel of
gunpowder from the inventory with the block and tackle to roll it to the
tree. Use the vine with the barrel to attach it to the block and tackle. Use
the block and tackle to raise the barrel to the top of the cliff. Walk west
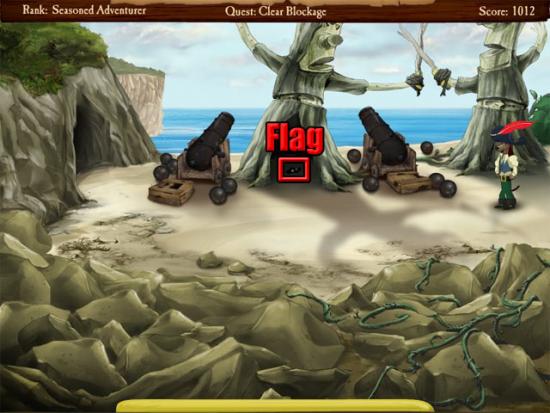
to the lookout point and take the flag piece from the hole in the tree:
Return to the top of the cliff in the forest and walk east to see Clara.
Use the barrel of gunpowder with the blockage. Use the cutlass with the
barrel. Use the voodoo cheat sheet on Rover and then cast the heat iron
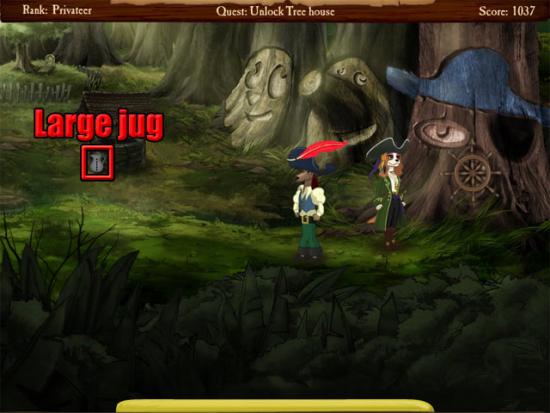
spell. Take the large jug next to the well:
Use the crank with the well and then select the well to receive compass 2. Select the well again to find a piece of eight. The aim now is to find three birthdays of the people mentioned on the back page of Silvereye's journal. Walk north to the grave and examining the gravestone to read that Mary was born in June (Month 6). Return to Clara and ask her about her birthday: May (Month 5). Read the journal to discover the month of Alexander's birth: August (Month 8). Select the wheel on the tree. Rotate the wheel clockwise five times, anticlockwise eight times, clockwise six times and anticlockwise three times to enter the treehouse.
Use the super key with the chest to take a piece of eight and a wooden
banana. Open the wardrobe to take a piece of eight. Select the rug to take a
flag piece. Take the small jug from the cabinet. Open the top drawer of the
cabinet for a piece of eight and the bottom drawer of the cabinet twice for
two sets of crackers. Use the wooden banana with the fruit bowl:
Take compass 3 from the secret panel that opens. Exit the treehouse.
Examine the right tree face for crackers. Walk east to the forest. The aim
now is to use one or more of the compasses on the stumps and then rotate them
to find the correct exit. The compasses to be used and the exits vary from
game to game. Keep going through the correct exits to reach the totem pole.
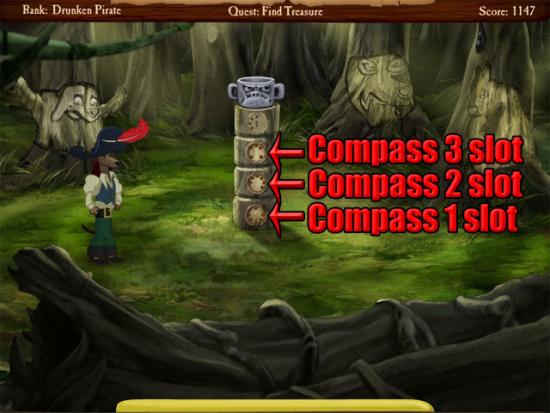
Use the three compasses on the slots:
Take the ugly mug from the top of the totem pole. Take the four plates
from the slots in the totem pole. Examine the second slot from the top to
find a piece of eight. Select the arm of the carving and then select the
mouth to take crackers. Examine the bag on the tree:
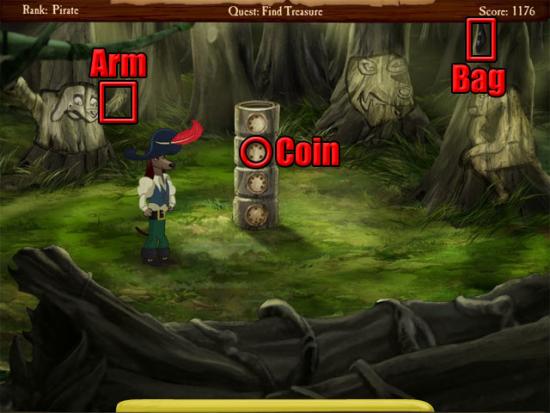
The bag is attached to a nail. Cast the heat iron spell and the bag will
drop to the floor. Select the bag to find the flag piece. Return to the
forest. Use the compasses on the stumps again and keep walking through the
correct exits to reach the cove. Select the hole in the tree for crackers:
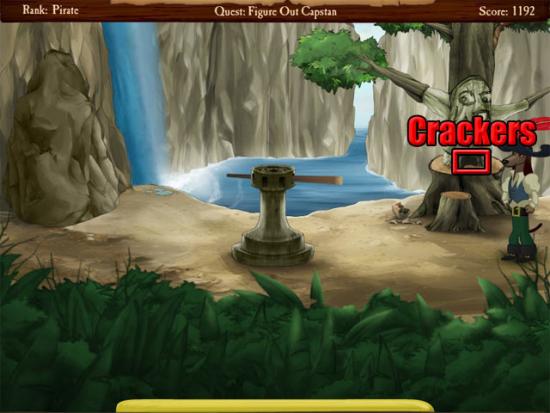
Use the ugly mug with the capstan. Select the ugly mug to see a single drop of water. Use the small jug with the waterfall to fill it with 3 units of water. Combine the small jug with the large jug in the inventory to fill it with 3 units of water. Fill the small jug from the waterfall again and combine it with the large jug in the inventory to leave 1 unit of water in the small jug. Use the small jug with the ugly mug. Select the capstan to move the rock. Select the capstan again to take the piece of eight. Enter the cave. Select any topics when talking to DeSilver and after the cutscene Rover will wake up on Spit Island.
Take the boot, the noose and the crackers from the barrel:
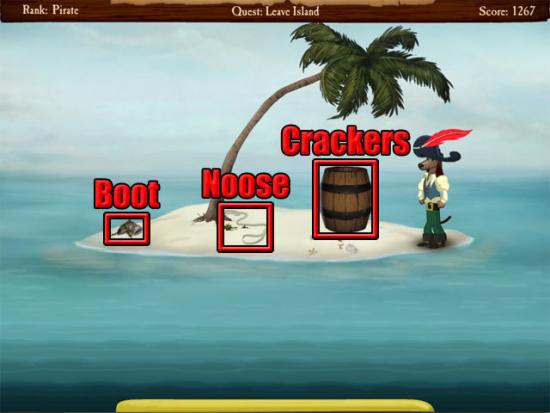
Use the voodoo cheat sheet with Rover and cast the lure beasts spell. While Rover is glowing red, use the old boot with the sea to lure a turtle to the island. Use the noose with the turtle. Use the voodoo cheat sheet with Rover again and this time cast the scare beasts spell. While Rover is glowing red, select the barrel to leave the island.
Return to the fort. Cast the heat iron spell and Rufus will take the
saucepan off his head. Select the palm tree and then cast the drop fruit
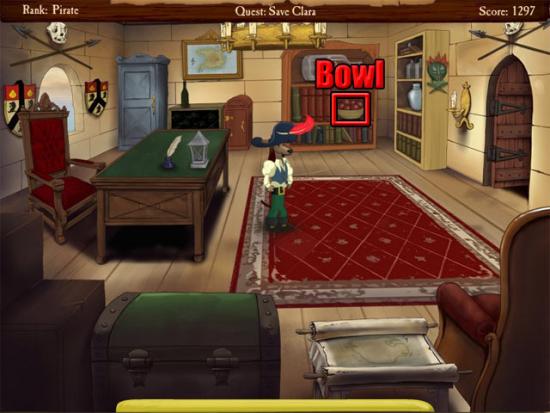
spell. Enter the fort. Select the bowl of wooden fruit to reveal a hidden
lever:
Select the lever and then enter the secret passage. Use the wooden fruit
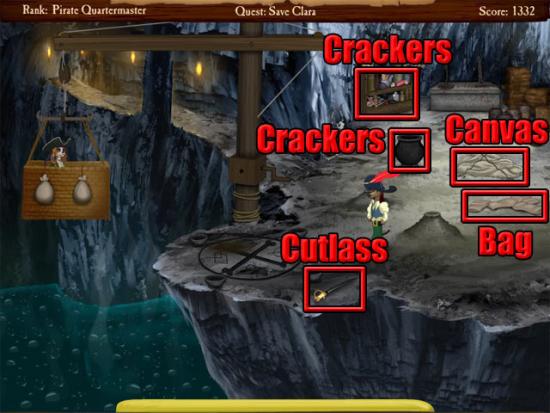
with DeSilver and then say “Think fast!”. Take the cutlass, the crackers from
the cauldron and the bookshelf, the canvas and the bag:
Select the crane to move the basket over the ground. Use the canvas bag with the vent and it will float away. Use the sail canvas with the basket. Take a rock from the blocked entrance to the room and use it with the vent. Take the rock from the vent. Select the basket to jump in and then use the cutlass with the basket to complete the game.
