| Walkthrough by ShinjiGR - ver. 1.0 Notes ----- 1. The inventory appears by moving the cursor to the upper part of the screen. 2. The Journal button gives you access to your journal with information sorted by chapter. 3. The Menu button gives you access to the main menu with the save/restore functions. 4. The Padlock button sticks the inventory bar to the upper screen even after the mouse cursor moves away. 5. The Sever button is the de-combine/open button. You can use it to get things out of things you have in your inventory. If you're stuck somewhere it's probably because you forgot this action. 6. The Book Of Harmonies button that appears at a certain point in the game gives you access to some puzzles/mini-games you need to solve in order to progress in the game. Bugs ---- Unfortunately the game has a couple minor bugs. - If at some point you find yourself unable to exit a location or even move Mozart, you'll have to load a previous savegame and if it happens again this time try to do things in different order. - In some chapters the descriptions of the objects in your inventory may change places. For example the bread will be called watch and the watch will be called bread. Don't worry! In these chapters you won't need any of the items with the reversed descriptions and the following chapters their names will return to normal. *************** * Walkthrough * *************** Chapter I --------- The dream. This is the intro sequence. Chapter II ---------- You wake up in your hotel room. You need something to feel better. Look around your room. Get the unfinished music score from on top of the bed. Go to the harpsichord and play a little. Open the cupboard and get the large spoon and the empty boiler from inside. From the bookcase you can get a candle. On the table there is a pouch you can take. On the fireplace there's a hook. On the dresser use the coffee grinder and then get some ground coffee. Now it's time to make coffee. Use the empty boiler on the pitcher of water near the wardrobe to get a boiler full of water. Then use the hook on the fireplace. Next put the ground coffee into the boiler with water to get cold coffee. Now hang the boiler with the cold coffee from the hook in the fireplace. Use the large spoon with the boiler and then the spoon with the hot coffee with the empty bowl on the table. Now you can finally drink some coffee from the bowl. The bell rings. You can't open the door 'cause it's too dark. Use the candle on the fireplace and then on the candlestick on the table. Now open the door. It's the owner of the hotel and wants his money. Ask him about any rumors and about Mazzini. Then use the sever icon on your pouch on your inventory to get your timepiece and a keyring. Give your timepiece to the owner. Go downstairs and talk to your manager. He wants you to finish the divertimento. Back upstairs and use the unfinished music score on the ink and quill on the table. A mini game begins. You have to put the notes in the correct place. Their position resets after each try but the music score remains the same. Unless you know the music score or you can deduct them by your ear it's simple trial and error. After a couple of tries you complete the divertimento. Go down and give it to your manager. Now you must make arrangements to get to the castle. Go outside the hotel and talk to the hotel owner who is sweeping the road. Then go the coach driver. You can't understand his language so go back to the hotel owner and ask him to translate. When he is translating for you ask him about rumors, then about the ride to the palace and then agree to pay after the performance. Now you're ok, so get back to the hotel, talk to the manager and select to go to the Opera. Chapter III ----------- You need to find a baton and the first part of your divertimento. Talk to the receptionist and then go left to the lobby. Enter the music parlor. Look at score and get the grains from on top of the piano. Examine the chair near the perch and get the letter slipped in book. The Book of Harmonies button is now activated in the inventory toolbar. Examine the pillow on the couch and get the feather fan (range). Get out to the lobby. Alexa is here. She asks for her feather fan so give it to her. She gives you the first part so use the beginning of the divertimento with the ending to get the complete score. Go outside to the lobby and then to the director's salon. Talk to the man sitting on the bench and ask for the Kappelmeister's key. You go in his box. There's a coat on the rack where you can get a conductor's baton. Go out to the lobby and then to the entrance hall and now go to the lobby on the right and the music hall. Use the complete score on the musician's lectern and the conductor's baton on the conductor's lectern. Now a mini game begins. It's simple. You only have to keep the end of the baton inside the circle as it moves around. After the rehearsal try to leave. Alexa and Haufer are there. Talk to Alexa and then to Haufer. Ask for your payment and tell him you must go to the Castle. He asks for the baton back so give it to him. Chapter IV ---------- You're back at the hotel. Talk to the shop owner at the left of the screen, Ask him about rumors and Figaro. He recognizes you and gives you a wooden flute as a gift. Go inside the hotel. The owner asks you to remove a pigeon from your room. Talk to the owner and ask him about rumors and Joseph II. Go upstairs and look at the pigeon. Use the grains from your inventory on the empty bowl on the table. Look at the bird. It has a message from your Masonic Brothers. Open the Book of Harmonies and press the "read the score" button. You now have to play a conductor mini game again. The better you play at this mini game, the more easier it would be to decipher the message. If you make only a couple of mistakes you'll need to remove only 5 letters in order to crack the code. Leave the code for later. You still need to make the pigeon leave. Open the wardrobe and get the empty boiler. From the table by the entrance get the hardened wax and use it on the embers in the fireplace to get softened wax. Go downstairs, exit the hotel and walk towards the coach. The fountain is broken. Use the softened wax on the wooden flute to get a softened flute tube and then use it on the fountain to repair it. Now use the empty boiler on the fountain to fill it with water. Go back to your room in the hotel and use the boiler full of water with the empty casket near the wardrobe. The pigeon drinks the water and returns on top of the wardrobe. Now open the window and the pigeon finally leaves the room. Go downstairs and now you're ready to go to the Palace. Exit the hotel and approach the coach. Talk to the coachman and give him the money. Now it's time to decipher the Masonic code. Go to the Book of Harmonies and press the "decipher the message" button. The weird symbols you saw on the grid and the on the score in the previous screen have nothing to do with it. There's a grid with letters from which you have to remove X letters (according to how well you played the conductor mini-game earler) in order to make sense of the message. The letters are read from left to right and from top to bottom and there's nothing to indicate the space between the words or how many words are in the message. The message is: Number Three Is Sacred. Now that you have deciphered the message just look at the coach to go to the Palace. Chapter V --------- You're here to meet Dr. Mazzini. Get the music sheet from the table. Talk to the guard posted outside the door. Ask him about rumors, Mazzini and Joseph II. Then enter the room. There's another guard outside the King's room. Ask him about rumors and Joseph II. To the left is Dr. Mazzini. Talk to him about Mazzini, Joseph II and Music for the Emperor. Now you must play reconstruct one of your previous works and play it for the Emperor. Open the wall cupboard and get the inkwell and quill from inside. Use them with the sheet of paper. Now use quill, ink and paper on the office table. A music score mini game begins. After you finish it you have the concert for the emperor in your inventory. Go to the harpsichord and use the concert with it. Unfortunately it's out of tune. Talk to the guard posted outside the bedchamber and tell him about the out-of-tune harpsichord. He'll give you a tuning key. Use the tuning key on the harpsichord and a puzzle begins. You can raise and lower the pitch of a note by turning the dial on each string left and right to tighten it or loosen it. You can hear the sound of a perfect A note, how the harpsichord currently sounds and how it's supposed to sound with the buttons on the right. First adjust the A note on the piano to match the sound when you play the tuning key. Then adjust adjust the rest of the piano notes by ear until the piano notes match the correct notes. When you tune the harpsichord correctly Dr. Mazzini tells you that the Emperor is feeling great. Chapter VI ---------- You arrive at the Masonic Lodge. Talk to the man leaning on the table. He's Peter Englander. Ask him about the origin of the Mason Rite. Then talk to the man sitting on the couch. He's Keller. Ask him about the Mason Rite. The door on his left is locked. Nothing to do there. Open the door to the boardroom where Ilan Havel is leaning against the wall and ask him also about the Mason Rite. Now get back to the main hall and talk to the guard outside the Venerable Schultz's Office. Talk to him about Schultz, the Mason Brothers and the Free Mason outfit. Use the curtain with the Mason logo on it and get the scarf and Masonic apron. Now go to the Founder's parlor. There's a blindfolded man by the piano. Talk to him. Get the Meter of a Free Mason from on top of the table and the Free Mason compass from the base of the bust. There is curtain on the back. Pull it. You can't open it for now. Go back to the main hall and talk to Englander and Keller about the unsavory apprentice. Get the mirror from the small table by the wall. Then go to the Founder's parlor and talk to Havel about the unsavory apprentice. Back to the main hall and talk to the guard posted outside Schultz's room. Tell him about the Masonic outfit but he says that you're missing the gloves. Talk to Englander but he doesn't have a spare pair. Talk to Keller next. He will give you his gloves if you prove your knowledge. He asks you to solve the Enigma of the Temple. Talk to Englander about the Enigma and a new puzzle in the Book Of Harmonics. Open the Book of Harmonics, go to the next page to activate the puzzle and press the "Read the Score" button to play the conductor mini game. Like before the better you do in this mini-game the easier it will be decoding the message. After you pass the conductor mini-game press "Back to the book" and then Decipher The Message. The solution is: Force And Stability. Talk to Keller again. He wants you to solve the Pillar puzzle and he gives you a key. Go to the Founder's Parlor and use the key on the cupboard. Get the Clockwork of Stability and the Clockwork of Force from the two drawers. Then join the two clockworks in your inventory to make the Clockwork of the Temple. Go back to the main hall and use the Clockwork of the Temple with the Sculpted cupboard by the wall. Time for another puzzle. The pillar is divided into four pieces. Each piece can has two pegs which can hold a cog each. On your right there are 6 cogs. 1 with 50 teeth, 1 with 40 teeth, 2 with 25 teeth and 2 with 10 teeth. There's also a button that starts the mechanism. Placing a cog on a pillar piece and pushing the start button will move the pillar piece accordingly. The objective is to align all four pieces vertically in the middle. The solution is: Upper Pillar piece - Upper peg: cog with 25 teeth, Lower peg: empty. Second from the top piece - Upper peg: cog with 50 teeth, Lower peg: empty. Third from the top piece - Upper peg: cog with 10 teeth, Lower peg: cog with 25 teeth. Lower Pillar piece - Upper peg: cog with 10 teeth, Lower peg: cog with 40 teeth. After you finish talk to Keller again and he finally gives you the gloves. Combine the gloves with the scarf and apron to get the Masonic outfit. Go to the Founder's Parlor and use the outfit with the folding screen in order to wear it. Back to the main hall and talk to the steward about Schultz. You can finally see him. Inside talk to Schultz about, Joseph II, Leopold and the unsavory apprentice. He gives you the poll coffer. You must set it up for the voting to begin. Get the Free Mason Hammer from the table by the wall. Go outside to the main hall and talk to Englader about the Masonic Tools. He gives you the Masonic triangle. Go to the boardroom and talk to Havel about the Masonic tools. He says the correct order is the ruler, the compass, the square and then the hammer. Now use the poll coffer on the empty base and then the Meter, the compass, the square(triangle) and the hammer. After you finish get back to Schultz and tell him about the Masonic Tools. Time to vote. Talk to everybody. Schultz and Keller vote Yes. Havel and Englander vote No. You are given a white and a black ball. Use whichever you want on the poll coffer. Chapter VII ----------- The apprentice Anton Epoch is lying on the floor. Talk to Havel, Englander and Keller. No one has anything interesting to say. Look at Anton Epoch. You must find a way to check if he's still alive. Use the mirror on him. He's dead. Now you need to investigate. Get Anton's score from the floor and use it with the inkwell and quill on the table. Time for another music score mini-game. After you solve it you get Anton's corrected score. Use it with the piano-forte. Go to the main hall and talk to Havel. Then go to the Venerable's office and get his key from on top of his desk. Return to the Founder's parlor and use the key with the locked grille (roast) in the back. Examine the reliquary. Leave and go to the boardroom. Here get the Mason tools and use the triangle with the compass. Back to the Parlor and use the triangle with compass on the reliquary to open it. Chapter VIII ------------ You are now in prison. Try your keys on the grille. Not working. Look at the fence to the cell and then use the mirror on it. There's another prisoner in the adjacent cell. It's Havel. Look at Havel and a conversation begins. Ask him about Keller, Escape and Epoch Lock. Try giving him the Clockmaker's keys but you can't reach him. Get the extinguisher from the left wall and use the keys with it. Now use the keys affixed to the extinguisher with Havel. For the rest of the chapter you control Havel. Use the clockmaker's keys with the locked door. You're outside but there's guard. Get the bat from the wall. The policeman uniform is too small. Look at the other prisoner and talk to him to get him talking. Then look at the empty cell on your right. You hide and then knock the guard out. You now have the keys to Mozart's cell. Back to Mozart and use the keys to set him free. Go to the staircase to climb on the roof. Walk to the plank. On the other side get the ankles and the axis of the pulley. Examine the support of pulley and the pulley with jammed axis. Go back and talk to Mozart and he gives you his Masonic hammer. Use the hammer with the jammed pulley to get the wheel of the pulley and then use the wheel with axis from your inventory to make a functioning pulley. Now combine the hammer with the ankles in your inventory and use it on the support of the pulley. Finally attach the functioning pulley on the support of the pulley and you get down. Chapter IX ---------- Back at the Masonic Lodge. It's time to investigate. Go to the Venerable's office and talk to him about Anton Epoch and the Reliquary. Pick up the weight from the scales on top of his desk. Go back to the main and pull the curtain. Examine the servant jacket behind it and you get the golden thread. Combine the golden thread with the weight to make a pendulum. Now go to the Founder's parlor and use the pendulum with the reliquary. It opens. Look at the inanimate beetle inside and then take it. Use the clockwork keys on the beetle and a puzzle begins. You have to move all six legs of the beetle at the same time. There's a decoder with 6 numbers which can be placed inside the beetle in different positions. Each leg of the decoder has a number and points to a picture of the beetle with one or more legs glowing red. The number in the decoder affects the timing of those legs. You can change the numbers in the decoder. They can only take values from 1 to 4. There's a winder on the bottom of the beetle which starts its mechanism. The solution is as follows: ----- |1|2| --+-- |1|2| --+-- |2|2| ----- After that the beetle enters the waiting mode. Go back and talk to the Venerable about the beetle. He doesn't believe you. Back to the Founder's parlor and use the beetle with the piano-forte. Play the piano but nothing happens so use Anton's corrected score on it and the beetle starts moving. The Heart of the Beetle puzzle is activated in your Book Of Harmonics. Once again open the book, go to the next page and here press "Read the score" to start the conducting mini game. Then "Back to the book" and "Decipher the message". The Solution is: Secret Power Of The Premier Go back to the Venerable's office and talk to him about the Secret of the Premier. You have to talk to Englander. Chapter X --------- You arrive at Robertson's Abode. There's a dog blocking your way so use the beetle with him. Now you can pass. You're in the entrance hall. There are three doors here. Try the one on the back. It's locked. So go to the first on the left which is the library. Examine the book folders in the bookcase. It's has only half of the engravement. Use the ladder. You find the other half. Now combine in the two book folders in your inventory to create the base. Examine the notebook on the sofa and get the magnifier on it's left. Before you leave the room read the book Of The Mystery Of Numbers which is on the table on the left of the door. You learn that the Golden Number is 13. Exit to the hall and go to the office (the door in the middle). Examine the clock and you open it. Examine it again and you can see a part of a mechanism that looks like a globe. Pull the curtain to reveal an inscription. Look at the inscription but you can't read it. Use the mirror on the inscription. You write down on your notebook the message and you unlock another puzzle in the Book Of Harmonies. Now open the drawer on the desk and you get a miniature and a metal cylinder. Time to solve The Ladder Of Mysteries in the Book of Harmonies. Like before find the page with the puzzle and play the mini game to determine the level of the difficulty. Now you decipher the message. The solution is: The Seventh Bar. Go to the library and use the ladder to get the statuette. Combine the statuette with the base and use the meter on the statuette with base to adjust it to the correct height. Now go back to the office and use the adjusted statuette with the clock. A wooden open clicks open where the inscription was. Walk to the wooden panel to a secret room. Examine the apparition on the wall. Walk to left and get behind it to discover a strange machine, the fantasmagore. Examine the machine to open it and look inside. Look at the empty space, the mechanism and the lamps. There are parts missing. Use the miniature on the empty space and the metal cylinder on the mechanism. Get back and examine the apparition. It looks out of focus. Disassemble the magnifier on your inventory (Sever button) and you get the handle and a lens (lentil). Now use the lentil on the focus lens and the image comes to focus. You were tricked! You never saw the Emperor! Try to leave the secret room. You hear strange noises from behind the door. Leave the room and you meet a strage woman. Talk to her about the noises from a fight, Peter Englander, Gipsy and then flatter her. You automatically give her the mirror. Walk out of the room to the entrance hall. The look which was previously locked now hangs wide open. Go through it. Englander is tied and gaged and the woman sneaks behind you and knocks you unconscious. Chapter XI ---------- You're on the stone bridge. Talk to the woman about apologies and her captive. Havel arrives. He knows this woman. Her name is Vana. Talk to Havel. You're now controlling Havel. Talk to Vana about explanation, Englander and play the 31. You decide to play Mozart's life on the cards. A card mini game begins. It's called 31. The closer hand to 31 wins the round. You can pick a card from the deck or pass. If you get 31 you automatically win and if you get over 31 you automatically lose the round. Whichever wins the round get money and the first to get over 15 wins the game. Even if you lose the game don't worry you can replay it as many times as it takes. After Havel wins Mozart is taken prisoner and control returns to Mozart. As Mozart go to the door of the roulotte. There's somebody guarding outside. OPen the window and then then try to open the shutter of the roulotte but the handle is missing. Now examine the cupboard. It's locked. There's a score beneath it. One of Anton's scores. Get the score. There's a small key beneath it so take it. Use the key with the cupboard to open it and from inside get the violin with bow. From the table near the door get the statue of a saint. Look at the tarot game on the lower right of the screen. Use the tarot game until you get the beetle card. There's a message in the card. Now it's time to correct Anton's score. Use the score with the inkwell and quill on the table and then use the inkwell and quill. A music score mini game begins. The scores from now on will be quite difficult unless you can recognize the patterns. Each instrument usually either plays the same as the previous or the next instrument or repeats itself after a couple bars. If you still can't figure it out, check the screenshot.
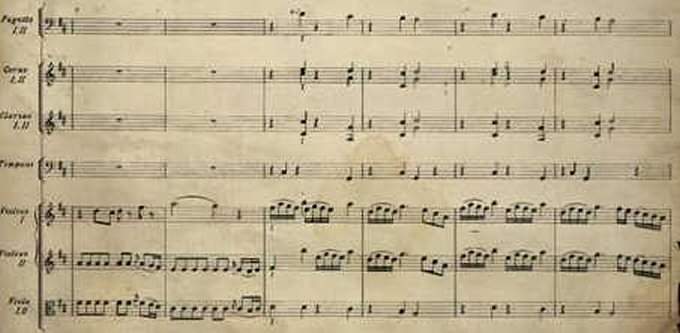
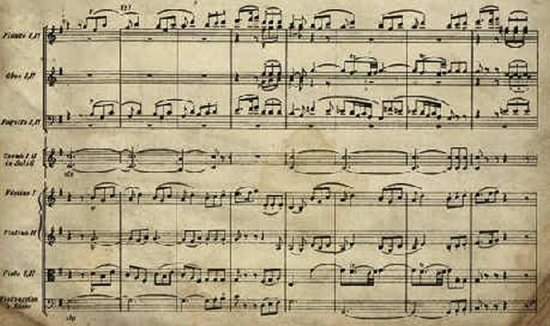
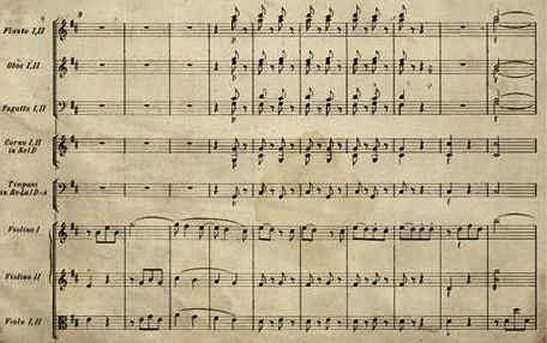
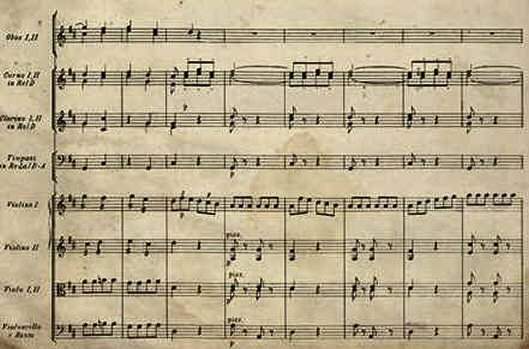
|