
S H A D Y B R O O K
Puzzles-Walkthrough
Len Green 23rd July 2005 lengreen@hotmail.com
PREFACE :-
I am a very poor raconteur, so this walkthrough contains only dry instructions without narrative(s). In my opinion however, the story is the best part of the game !
My apologies in advance !!
Website Remake and demo: 01-08-2016
Don't know this WT can help with the 2016 version ?
****** The 1st time you play the game you have a choice of 2 ‘non standard’ modes … that is, if you want to choose either or both !!
Quote from the game’s opening ----- Be warned, however, that - though the overall game will not be affected – you may miss certain details pertaining to the plot if you activate either or both of these modes !!
I CHOSE NEITHER OF THESE OPTIONS, AND THIS WALKTHROUGH IS BASED UPON THE FULL GAME. I would personally recommend others to do likewise !!
**** Censored Mode :-
This mode removes any disturbing, violent, and sexual scenes. (Although in my opinion there is no content which does not appear in standard family TV and films. Incidentally, there is absolutely NO bad language in the game).
**** Adventure-Only Mode :-
This mode removes a few sequences which depend upon timing &/or reflexes. (Although again in my opinion there are no REALLY DIFFICULT sequences of this nature !).
INTRODUCTION :-
{A} This ‘puzzles-walkthrough’ as the name implies, describes only the MAJOR puzzles in the game. There are also a number of ‘secondary’ puzzles which can easily be missed (as I well know to my mortification !). These do not spoil your continuation and conclusion of the game … but cause you to miss some worthwhile content … and of course, points ! L
The Author and Developer (Christopher M. Brendel) has published a full companion guide in which a complete run down of the game in ALL its aspects is described … containing amongst MANY other details a full and comprehensive walkthrough, including ALL of the puzzles, point scores, Easter Eggs, etc., etc.
{B} The game is so rich in characters who are continuously moving to different locations in the town and at different times, that I am not attempting any ordinary walkthrough. Apart from anything else, the narrative is so gripping that it would be a pity to anticipate it !
{C} Despite the fact that Shady Brook is a very small town, there are nevertheless a dozen different locations to visit and explore. Since my sense of direction is not very good, I am not describing how to travel from place to place. There is an in-game map which helps, but it doesn’t ‘transport’ you (magically) to the different locations … you have to find your way yourself (or with help from Chris’s companion guide).
I have added a list of all the locations you will have to visit during the game at the end of this walkthrough … see [ 14 ].
{D} Probably due to a combination of all of the above, I personally dropped quite a number of the maximum possible points … I’m not going to mention how many L.
{E} At some stage(s) in the game your notebook and valuable onscreen prompts indicate objectives to perform, and flag you when completed.
{F} The puzzles are listed in the order in which they appear during the game. Most of the solutions are graduated (line by line) to different extents, so that the reader may decide to stop using them at any stage and continue independently through to the end.
{G} Some puzzles need the solution from a previous one before they can be solved.
{H} There are quite a few puzzles which are NOT described in this walkthrough … but will only be referred to AT THE END in passing !
i.e. Those puzzles which randomly reset each play ; and those which involve ‘mild’ action
and for which FULL instructions and help are given in the game itself (making them quite superfluous to repeat here !)
******************************************************
[ 1 ] How to open the safe in the master bedroom.
*** The master bedroom is locked … before anything else, you need to get inside.
*** Look under the fireplace mantelpiece.
*** There is a key glued there.
*** You must find a way to release the key.
*** The glue needs to be softened
*** This can be done by heating.
*** You’ll want a box of matches from the General Store .
*** Use your wallet to buy them.
*** Warm the glue with the matches.
*** Take the key.
*** Use the key to open the door to the master bedroom.
*** Try to open the safe.
*** You need a numerical code to open it.
*** You will not be able to find the code &/or do this until you have completed [ 4 ]
[ 2 ] The box(es) puzzle … Part-a (6 boxes).
*** Click on the multi colored box on the shelf.
*** Examine it in inventory.
*** Look at the 6 colored squares (boxes ?) and ‘manipulate’ them.
*** By moving your cursor to the top and bottom and sides of each box, arrows appear … up, down, right, and left.
*** By clicking on these 4 arrows and the finger-cursor, the circle (a ball? A balloon??) can be positioned in any of the 4 sides or the center of each box.
*** Note the colors of the boxes.
*** Move your cursor around the screen … not on the boxes. Over a good deal of the green background area it will change to a circular arrow cursor.
*** Click on this circular arrow cursor.
*** Observe the rotating box and its different colored surfaces … you can repeat this as often as you like.
*** The front is green, and the back is yellow. The top is red, and the bottom is brown. The right side is violet, and the left side is blue.
*** Apply the above to the 6 circles inside the (smaller) colored boxes.
*** From left to right :- red … top ; yellow … middle ; green … middle ; brown … bottom ; blue … left ; violet … right.
*** The left end of the box opens and a second (mottled brown) box slides out !
[ 3 ] The box(es) puzzle … Part-b (mottled brown box).
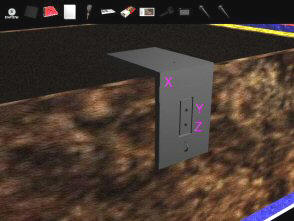
*** Look at the clamp and particularly at the 2 nails.
*** Click on each nail and they will be removed, and stored in inventory (Graphic-1).
*** Move your cursor to the lower (vertical) half of the clamp (i.e. X :- the part where the 2 holes Y and Z are), and you’ll see a special cursor with the word ‘open’ beneath it.
*** Click on this ‘open’ sign. It won’t open … It’s locked.
*** Fill the 2 holes Y and Z with the 2 nails from inventory.
*** Click again on this ‘open’ sign, and the box opens.
*** Remove both nails again (into inventory).
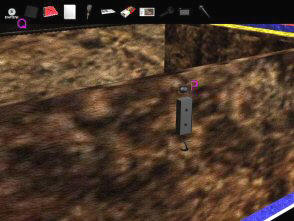
*** Take either nail from inventory and put into the hole marked P on Graphic-2.
 |
 |
 |
| Graphic-1 | Graphic-2 | Graphic-3 |
*** Move your cursor to anywhere in the black area at the top marked Q (on Graphic-2), and you’ll see a special cursor with the word ‘close’ alongside it.
*** Click on this ‘close’ sign.
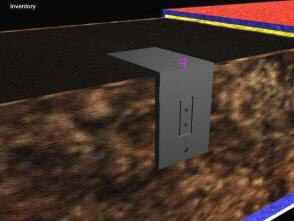
*** Put the remaining nail from inventory into the hole (R) in the top of the clamp ( See Graphic-3 ). *** From the left end of this box, a third box (or tray) slides out.
[ 4 ] The box(es) puzzle … Part-c (white switches).
*** Note the 2 white switches on this (third) box, and also the 3 gray squares.
*** Click the left hand white switch … a keyhole appears in the middle of the left hand gray square.
*** Click the right hand white switch … the aforementioned keyhole disappears, and a third white switch appears in the center of the middle gray square.
*** Click this switch in the center of the middle gray square, and the keyhole reappears in the left hand gray square.
*** Click the original left hand switch and then the original right hand switch. The keyhole disappears again and the right hand gray square opens to reveal a key.
*** Click on the key and it enters inventory.
*** Once again, click the original left hand switch and the keyhole reappears in the left hand gray square.
*** Use the key you just obtained (now in inventory) on the keyhole. A drawer opens, and you obtain a secret number.
*** The number is 5231 … click it in close-up, note it, and exit the puzzle(s).
*** This is the number you need to open the safe in the master bedroom ( See [ 1 ] ).
---------------
*** You can now return there and open that safe !
*** Enter the above number, pull the handle and the safe opens revealing a circular opening which you can only deal with later ( See [ 11 ] ).
*** There is also a coded poem which gives some hints for later on in the game. You CAN decode it NOW (I did !). But it is very much better and far easier to wait until after you have finished [ 5 ], when you will obtain automatic access to a very useful mechanism which helps greatly in deciphering
( See [ 6 ] ).
[ 5 ] Kate’s washing.
*** View the close-up of the instruction-card between the cups. There are 3 tasks to perform.
*** Since the blue bottle is the fabric softener, the red bottle whose label is hidden (at present) must be the laundry detergent.
*** Click on the red detergent bottle, and then click on the 11 oz cup and it is filled full.
*** Click on the full 11 oz cup, and then click on the 6 oz cup and it is filled … leaving 5 oz of detergent in the 11 oz cup.
*** Click on the 11 oz cup (which now contains only 5 oz), and then click on the 4 oz cup and it is filled … leaving 1 oz of detergent in the 11 oz cup.
*** Click on the full 6 oz cup, and then click on the 11 oz cup (which now contains only 1 oz) … you now have 7 oz in the 11 oz cup.
*** Click on the 11 oz cup (which now contains 7 oz), and then click on the washing machine opening … this pours the requisite 7 oz of laundry detergent into the machine.
---------------
*** Click on the blue fabric softener bottle, and then click on the 11 oz cup and it is filled full.
*** Click on the full 11 oz cup, and then click on the 6 oz cup and it is filled … leaving 5 oz of fabric softener in the 11 oz cup.
*** Click on the 11 oz cup (which now contains 5 oz), and then click on the washing machine opening … this pours the requisite 5 oz of fabric softener into the machine.
---------------
*** Click on the washing machine’s middle button (the smaller one between the 2 larger ones). The washing cycle begins and a cut-scene between Jake and Kate ensues. … WITH AN EXTREMELY IMPORTANT HINT ( see [ 6 ] - SPOILERS ) IN THEIR DIALOG.
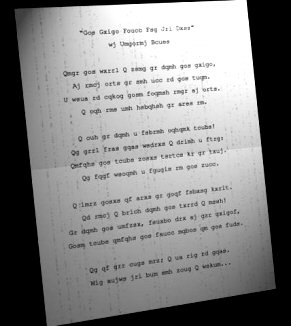
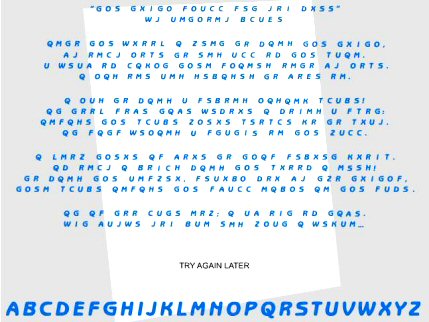
[ 6 ] Deciphering the coded poem.
*** This puzzle could have been solved earlier ( See the end of [ 4 ] ), and indeed I personally DID so without knowing that there was a very helpful mechanism to make the puzzle much easier !
*** In any case, this puzzle which is not very difficult for native English speakers, maybe insuperable for some people whose English is not their first language !
*** However, the following should enable anybody to solve it ! At the end are 3 graduated spoilers !!
*** Although it is probably not be the best way, the following is how I personally did it … there are of course MANY other alternative methods :-
*** In inventory, click on the coded poem and you obtain Graphic-4.
*** Click on that and you’ll get the ‘decryption device’ ( see Graphic-5 ).
*** The original coded document (16 lines) covers most of the top part of the screen. It is clearer than the original and colored blue.
*** Beneath it in a single line and also colored blue but much larger, is the English alphabet.
*** There is quite a lot of trial and error involved in the following :-
 |
 |
| Graphic-4 | Graphic-5 |
*** There are only two English words of one letter “A” and “I” which must therefore be represented in the coded version by “Q” and “U”.
*** By some sort of reasoning (and possibly trial and error, I figured that “Q” probably represented “I” and “U” probably represented “A”.
*** So you click first on a “Q” in the text, and then on the “I” in the (bottom) alphabet. EVERY “Q” in the coded document then turns instantly into an “I”
*** Then you click first on a “U” in the text, and then on the “A” in the (bottom) alphabet. EVERY “U” in the coded document then turns instantly into an “A”
*** Each time you substitute any letter, the substitution occurs for EVERY occurrence of that letter. You should continuously look to see if ANY clashes occur … i.e. words or parts of words which are impossible ! (e.g. “igto”, “breod”, “opered”, etc., etc.). It’s worth while noting down ‘successful’ substitutions as you proceed.
*** I then looked at the several 2 letter words beginning with “A” or “I”.
*** the 2nd (last) letter is probably “M”, “S”, or “T”.
*** From this I deduced (partially guessed, maybe !) that “G” probably represented “T”, and “F” probably represented “S”.
*** So you click first on a “G” in the text, and then on the “T” in the (bottom) alphabet.
*** And likewise, you click first on an “F” in the text, and then on the “S” in the (bottom) alphabet.
*** I then noticed that there were 2 two letter coded words “GR”. On the assumption that “G” represents “T”, then “R” MUST represent “O”.
*** So you click first on an “R” in the text, and then on the “O” in the (bottom) alphabet.
*** I then saw that in the top line (after a probable title) there appeared the ‘word’ “IMTO”. Clearly the “M” MUST represent “N”.
*** So you click first on an “M” in the text, and then on the “N” in the (bottom) alphabet.
*** Now look at the second line down from the top. It seems most likely that it indicates that the document was written by the previous owner of the house who “passed away” and left it in his locked safe !
*** So it’s not far fetched to exchange about 8 letters.
*** The second line should now read “BY ANTHONY CLAVE” ( see Graphic-6 ).
*** You have now deciphered just over a half of the alphabet. It should now be fairly easy to carry on through observation, trial and error, eliminating ‘impossibles’, etc. until you complete the whole document ( see Graphic-7 ).
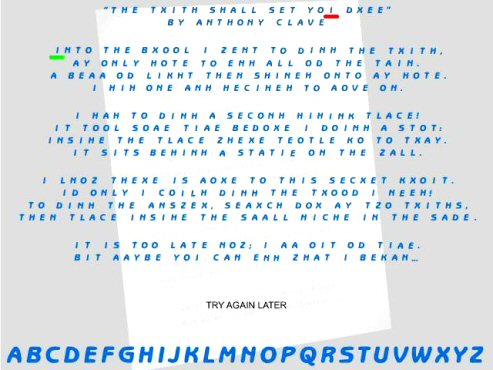
Graphic-6
CAUTION :- Both in the above, and in the following SPOILER, you must take great care … as follows :-
*** The following is just one example, but it applies throughout the whole ‘process’ ………….
*** Looking at the very top line, it’s obvious that you have to click first on the “I” underlined in red in the text, and then on the “U” in the (bottom) alphabet ( see Graphic-6 ).
*** HOWEVER, take care NOT to click first on the “I” underlined in green in the text, and then on the “U” in the (bottom) alphabet. The reason is … the “I” underlined in green in the text is NOT an ‘ORIGINAL’ symbol in the coded poem. It was originally not an “I” but a “Q”.
****** YOU MUST ONLY SUBSTITUTE ORIGINAL LETTERS !!
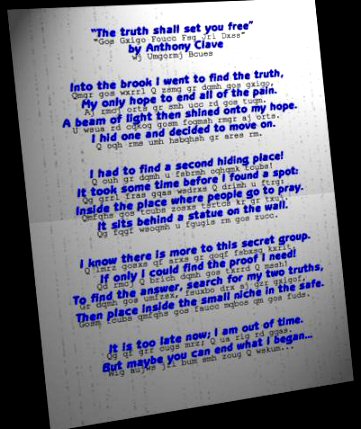
Graphic-7
SPOILERS
*** Kate Ekan, while Jake is doing the laundry ( see [ 5 ] ), tells you the title of the poem which is "THE TRUTH SHALL SET YOU FREE". This is the top line of the document.
*** The second line down from the top indicates that the document was written by the previous owner of the house who “passed away” and left it in his locked safe ! So the second line down should be “BY ANTHONY CLAVE”
*** The above 2 spoilers give you a huge start with 15 substitutes (over half of the 26 letters in the alphabet).
*** Taking into account the above caution ……
“Q” changes to “I” ; “A” changes to “M” ; “H” changes to “D” ; “L” changes to “K” ;
“T” changes to “P” ; “Z” changes to “W” ; “K” changes to “G” ;
[ 7 ] The mirrors puzzle.
*** If by any chance you have trouble with this puzzle, please see the very end of this [ 7 ]!
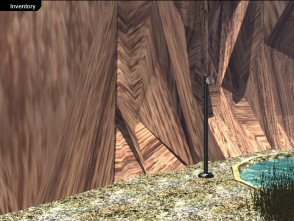
*** Go through the gap in the railings and arrive at the bridge.
*** At the left side of the screen is a mirror (Graphic-8), and at the extreme right edge of the screen is a second mirror.
 |
 |
| Graphic-8 | Graphic-9 |
*** Go forward and cross the bridge, and move forward once more.
*** Move once to the left and notice the pile of stones.
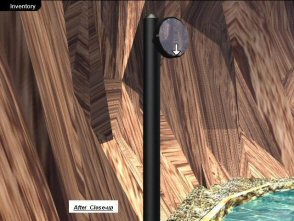
*** Move left twice more and observe a third mirror (Graphic-9).
*** Observe this third mirror in close-up.
*** When you sweep your cursor over the surface of each of the 3 mirrors, 3 arrows are displayed … an up, down and horizontal arrow (Graphic-10).
Graphic-10
*** Click the down arrow and the notch on the circumference of the mirror goes up.
*** Exit the close-up, and move right once and you arrive at the bridge again.
*** Cross the bridge back again, and move forward once more.
*** Move right once and you will be facing the bridge as previously.
*** Once again notice the mirror at the left side of the screen.
*** Observe that abovementioned mirror in close-up.
*** Click the up arrow and the notch on the circumference of the mirror goes down.
*** See how the light beams travel, and in particular where they end up !
*** If by any chance you have trouble with this puzzle, check that the notch on the mirror at the right edge of the screen (which you shouldn’t have touched !) is set in the ‘middle position’. If not, set it, and start again from the beginning !
*** Exit the close-up.
*** Go forward and cross the bridge again, and move forward once more.
*** Move once to the left and examine the pile of stones.
*** This time, pick up the ‘half-amulet’.
The following puzzles are only listed briefly, together with general descriptions only :-
They are all puzzles which randomly reset each play , &/or those which involve ‘mild’ action and for which FULL instructions and help are given in the game itself (making them quite superfluous to repeat here !)
[ 7 ] The gas station Pipes puzzle.
*** The object of this puzzle is to obtain one continuous connection of glowing pipes from the left edge of the screen to the right edge.
*** You can rotate the pipes by clicking on them.
*** If a pipe connects to a glowing pipe, then both pipes will glow.
*** The initial orientation of each pipe is random, and so there is no specific strategy to solving this puzzle. The best advice I can give is to try to stay on the upper half of the screen and ignore all of the pipes on the lower half. Good luck!
*** You can “Give Up” and skip this puzzle !
*** There is certainly more than one way of succeeding … however, see Graphic-11 for one such solution.
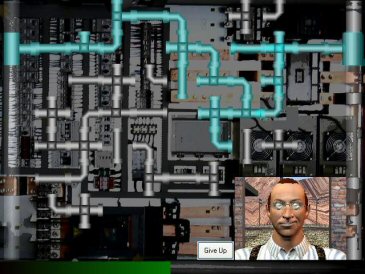
Graphic-11
[ 8 ] The pool game.
*** I have played billiards and some snooker … but never any pool (which has similarities)! However, the simple rules of the game are very clearly laid out on the poster next to the pool tables. Read the instructions if you’re not sure of the game !
*** The mechanics of Shady Brook’s computer version are likewise very clearly outlined on-screen as you play the competitive game(s).
*** The game is both entertaining and pretty easy to win !
[ 9 ] The fight (1).
*** Again, instructions are included in-game. Just get Jake to hit Rusty as hard and as often as you can.
*** The strongest punch by far is punching Curly's face with your right hand … by clicking the right mouse button. He'll say "Hey, not the face!"
*** Just do this repeatedly and it’s easy to win.
[ 10 ] The slider puzzle.
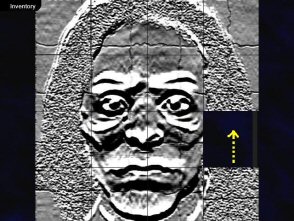
*** When you are at Robert Thompson’s coffin, look at it in close up and you’ll see an engraving of the man himself.
*** Another close up on Robert Thompson’s engraving and you obtain a slider puzzle of his head.
*** No specific instructions can be given since each time the initial configuration is randomly different. However, it is a relatively easy slider puzzle.
CHEAT :- Some players have GREAT difficulties with any slider puzzles … or just hate them! You can bypass this one by clicking slowly 3 times in the bottom-left corner of the screen (N.B. You will lose just a few points however !).
*** In case the final picture is unclear, see Graphic-12.
*** When you have succeeded, some steps will open up in front of the coffin. Go down the stairs and continue the game there.
Graphic-12
[ 11 ] The cassette and tape recorder puzzle.
*** There are certain steps which have to be taken before you can start approaching the end of the game (not the end itself !).
*** You need a tape recorder. You can obtain this any time after you have completed [ 4 ].
*** In addition, you need one half of an amulet. You can obtain this any time after you have completed [ 7 ].
*** You also need the second half of that amulet. You can obtain this any time after you have completed [ 10 ].
*** In inventory, put the 2 halves together to make one complete circular amulet.
*** Return to the master bedroom in Jake’s house and open the safe ( See [ 4 ] ).
*** Place the complete amulet (from inventory) into the circular hole in the back of the safe.
*** Move your cursor a very small distance from the circumference of the amulet, and observe the right pointing white arrow.
*** Click on this arrow, and a panel will open.
*** Take the cassette which is inside.
*** In inventory, put the cassette into the tape recorder.
*** Examine the loaded tape recorder in inventory, and press its play-button.
*** Listen carefully to the voice … and act accordingly.
*** You can now continue towards the final stages of the game.
[ 12 ] The touch pad … in prison.
*** After Jake is incarcerated in prison, the sheriff harangues him and then leaves his office. As he leaves, there is a short but visible cut scene of him pressing 4 numbers on his touch pad … the numbers are highlighted in yellow !
*** Pay careful attention and note down the numbers (code). You’ll need it when Jake is able to leave the cell and office !
*** The number is 5712.
[ 13 ] The fight (2).
*** Once again, instructions are included in-game. Just get Jake to hit Rusty as hard and as often as you can.
*** The strongest punch by far is punching Curly's face with your right hand … by clicking the right mouse button. He'll say "Hey, not the face!"
*** Just do this repeatedly and it’s easy to win.
[ 14 ] *** List of locations ***
****** These are the locations you will visit during the game. They are in no special order. Some will only be available later in the game.
*** Jake’s house ; Kate’s house ; Gas station ; General store ; Barber shop ; Church ; Cemetery ; Laundry ; Lucky Star Motel - Reception ; Motel - Room ; Rusty’s Bar & Grill ; Diner ; Sheriff’s office (Town hall) ; Mayor’s office (Town hall) ; Post office (Town hall) ;
Cave ; Bridge ; Chief’s cabin ; Secret passage.
