
“Scavenger
Hunter”
Supplementary RANDOM
GUIDES
to
the VERY detailed official “Sagewood
Software” Hints!
Free
Download from -----
http://members.aol.com/albiaprime/sh4-download.html
Len
Green
4th January
2007
INTRODUCTION
~~~~
This guide is in no way a substitute for the SUPERB and extremely
detailed Hints provided by the Developers (“Sagewood
Software”) of Scavenger
Hunter. It
merely contains some superficial additions and maybe some possible
clarifications.
For detailed Help, please refer to the abovementioned official Hints!
~~~~
This guide ONLY deals with GENERAL PROCEDURES
which apply to every game &/or
~~~~
ALL graphics in this guide apply to one specific (’personal’)
Mission/game ONLY. Due to
the very extensive AI, yours will be fundamentally the same, but with
(sometimes considerable) differences of some specific details… so please
don’t be disturbed when yours are similar but not identical!
PREFACE
{A}
IMHO,
Scavenger Hunter is quite different from the many ‘standard’
Quest/Adventures produced. In fact it is pretty well unique.
Since it’s so different from other Adventure games, it may possibly
be difficult to understand some of the workings of the game, or of its basic
principles, procedures or objectives. As
a beta-tester I encountered some procedures for which I needed some help from
the Developers, and so I assume that some other folk may also welcome a bit of
general assistance from somewhere!
It
is impossible to write any ‘normal’ walkthrough since the game is
thoroughly randomized every time it is started from scratch… even by the
same player on the same computer.
{B}
Just
to begin with, every time the game is started afresh (not after saving of
course), 5 Worlds are randomly selected out of 9.
Simple mathematics determines that this in itself produces 15,120
permutations; and even if the order is not taken into ANY consideration, there
are 126 different combinations.
And
this is just the beginning:- Codes, situations of objects, stolen items,
plasma fuses, puzzles, portal-positions and operations, etc., etc., are ALL
randomized to a greater or lesser degree.
Hence there are very many thousands of different variations and an
almost infinite number of different possibilities.
Therefore, every single game differs from every other.
It is almost impossible for any particular game to be reproduced IDENTICALLY
by anybody, EVER .
{C}
The
best that can be done in the way of general assistance is
the magnificent hint service provided by the Developers (“Sagewood
Software”)
at
http://members.aol.com/albiaprime/sh4-download.html
It can be downloaded as an .html file with the answers ‘hidden’, or
even printed out with both the questions and answers clear and visible.
The
only other ways that I can think of for solving severe stuckness in Scavenger
Hunter is to make a save as close as possible BEFORE the stuck-situation
and then forward this saved game to the Developers (or anybody else who knows
the game very well and is prepared to help out) for ‘next/further
instructions or hints’.
Or to get help from one of the Adventure Forums… Hints
& Help Sections!
{D}
There are absolutely no
action sequences, and you never get killed in this game. There is no
so-called ‘bad language’ or ‘adult material’. It
is all first person and mouse driven point & click.
In addition, there are NO slider puzzles, sound or music puzzles, or
mazes in the game!
{E} EVERY
TIME you obtain items, they appear in your inventory.
It’s always worthwhile dragging the magnifying glass onto each
new item to get an excellent enlarged picture of the item together with a
brief description of it.
N.B.
It is imperative to view, and sometimes to
manipulate, some of the inventory items in close-up in order to utilize them.
FOREWORD
[[a]]
Every time you start a new game you generate completely new parameters
and hence ‘lose’ your previous
There are an infinite number of save-slots. Each save is very
small… only 19 KB (and 5 KB if zipped).
[[b]]
If you get totally stuck and wish to try another DIFFERENT mission (maybe only
temporarily) without ‘destroying’ your present one, you can
always ‘preserve’ your very last save by copying it from the Scavenger
Hunter main folder/directory on your Hard Disk onto any other folder.
You can then at ANY time in the future re-insert that save, and
thereby return to that original
Easier
still;-
You can simply leave your ‘present’ saves where they are, start a
new game, and add your next series of saves below them.
[[c]]
As opposed to everything that
has been written above, just the very beginning and very end of every game ARE
IDENTICAL for every Mission and hence WILL
be outlined below in full, just as in a ‘standard’ walkthrough!
GENERAL GAME OBJECTIVE(S)
The narrative of the Scavengers’
World, Insurance, etc., is described at the very beginning of the game and
hence does not need repeating here.
Also, the interface and general mechanics are fully explained in the
Manual and in the Help section of the main opening Menu.
[1]
After an extremely short
preliminary search in an office, you enter the Home Office Portal Room.
[2]
You
have to exit the Home Office Portal Room in order to start your search in the
different Alien Worlds.
[3]
THIS
CONSTITUTES BY
FAR THE
BULK OF
EACH GAME!
Once you have left the Home
Office Portal Room, you are free to explore 5 of the 9 possible Alien Worlds.
N.B. It is quite
possible that additional Worlds will be added in later versions of the game,
or as supplementary add-ons or expansion-packs.
As mentioned above, each time you restart the game, the randomizer
generates a different set of 5 Worlds so that only very rarely can you obtain exactly
the identical set of 5 Worlds as in any previous games (to do so, you may
statistically have to undertake a great number of Missions).
However as a general rule, after a relatively small number of Missions
(statistically after somewhere between a half and one dozen Missions) you will
have come across all the 9 Worlds… but they will always differ in many
aspects!
Inside the 5 randomly
generated Worlds are hidden about a dozen and a half (varies with each game!)
stolen items, and also 5 special ‘power crystals’.
Your
Each stolen item has a listed ‘Insured value’ and hence the more
you retrieve, the greater the reimbursement you will receive for your
admirable efforts at the very end of the game!
In addition, if you manage to obtain ALL 5 of the ‘power crystals’
and use them correctly near the end of the game you will receive a 15%
cash bonus :
[4]
When you have completed
all your tasks (or as many as possible) in the 5 different Alien Worlds (as
outlined in [3] )you have to find a way
to the Alien Control Room.
[5]
Finally, you have to
perform the necessary actions to exit the Alien Control Room in order to
return to the office, obtain the (hopefully large and deserved) remuneration
for your efforts, AND COMPLETE
YOUR MISSION.
You can then start on another
[
1 ] Very
beginning… in the office
*****
Click the up-arrow (‘DOOR OPEN’) and enter the office… Actually,
if you wait just a few seconds, the door opens automatically and you can just
walk in!
*****
Look at your inventory. You
start the game with 3 Scavenger Hunt items:- a magnifying glass; a crystal
carrier; and an Alien device.
***** Go Forward, Right, Forward, Left twice, Forward.
*****
Look down and use the magnifying glass cursor to see the letter of
commendation from the IUIC (Inter Universe Insurance Corporation).
*****
Use the action cursor on the IUIC letter to pick up the ‘stolen items
list’ .
*****
Look at the ‘stolen items list’ in inventory by dragging the magnifying
glass onto it.. This list
will be different for every game.
The absolute maximum number of stolen items in any
Drag the cursor over the stolen items and you will see a white
‘bubble’ containing the word “INFO” emanating from each one.
Use this to click on any stolen item and you obtain a full description
of it together with its insured value.
At the bottom of the list is the grand total of cash you will obtain
if/when you retrieve ALL of the listed items.
Notice the check-boxes to the left of each stolen item.
Later in the game, in the Alien Worlds, as you retrieve each item and
scan it with your inventory scanner, its relevant check-box gets
automatically filled with a red tick!
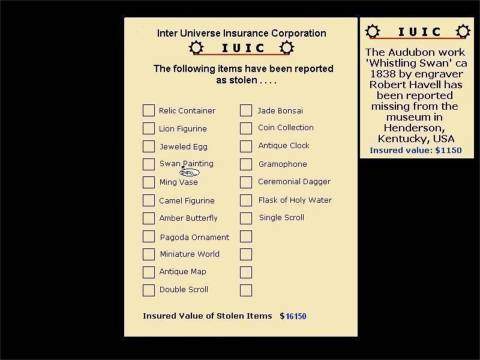
Graphic-1
*****
Go down and notice the satchel.
*****
Grab it.
If you look at it in inventory, at this stage it is empty.
It only plays a subsidiary role in the game and is not absolutely
essential. At any stage in the
Alien Worlds it can act as a receptacle for stolen items ONLY.
If you feel that your inventory is becoming cluttered, you can move
stolen items into the satchel to relieve the clutter.
You can always see these items in the satchel and click on any of them
to return them to your inventory if you so wish.
*****
Return up and go Left.
*****
Notice the scanner.
*****
Pick it up.
If you look at it in inventory, at this stage it does not ‘react’
and serves no purpose. You have
to be in the Alien Worlds (and to have collected a stolen item) for it to be
of use!
*****
Go Left and Forward to the office door.
[
2 ] In the Home
Office Portal Room… to travel to the Alien Worlds
*****
Open the door from the office to the Home
Office Portal Room.
*****
Go Forward twice, Left, Forward twice.
*****
Observe the portal control device.
This is the device which opens up access to the Alien Worlds.
But this particular portal control device is different from the many
others you will come across (except one) during the rest
of the game. Firstly, it has 4
colored segments instead of the usual single color.
Secondly, as opposed to the others, you cannot look down at its base
nor open it up to look for possible fuses.
The 4 colored segments only appear on TWO portal control devices:- The
present one in order to enter the Alien Worlds, and one other towards the end
of the game when you have finished in the Alien Worlds and need to return
‘home’ (i.e. to the Alien Control Room).
There is obviously no difficulty in finding this (‘fixed’)
particular portal control device, but it is much more difficult to discover
the location of the (final) portal control device (which varies randomly in
each game) which you have to use in order to return and finish
the Mission!
*****
Activate the portal control device by clicking the action cursor on it.
This enables you to progress into the main part of the game i.e.
searching the Alien Worlds.
***** Go Left.
*****
View the portal itself… See Graphic-2.
In the center of the
portal there is a small picture of the first Alien World to which you will be
transported! Once again this will be different for every game… this
(completely arbitrary) example indicates that the first Alien World the player
will visit is the “Wishing
*****
Click the action cursor onto the portal, and accompanied by the sound
of thunder you will be transported to your initial Alien World (in this
specific case, to the “
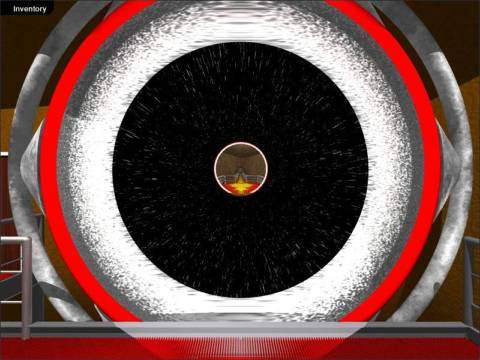
Graphic-2
[
3 ] The Alien
Worlds: A few general clarifications.
*****
As outlined above, due to the manifold randomizations, no
‘standard’ walkthrough can be written to cover this section which constitutes
by far
the bulk
of each
game.
*****
However, the abovementioned official extremely detailed Hints
provided by the Developers (“Sagewood
Software”) of Scavenger
Hunter, together
with some volunteer helpers on Hints-Sites, may iron out the
possible very many hundreds (or more) of variable individual puzzles
that are likely
to be encountered.
*****
The nine possible Worlds (at present… more may be added later) in
random order of course are:-
The Wishing
The
Apple Orchard
The
Desert
The
Farm at Night
The
Castle
The
Plateau Estates Winery
The
Mushroom Farm
Mt.
Musty
*****
There is nothing basically original in the following clarifications…
but a very few general stucknesses (if encountered) may be overcome by these
additional supplements, below ?!? :-
-
- -
- -
- -
- -
- -
- -
- -
- -
- -
- -
Arithmetical
puzzles:-
*****
When some folk come across so called Mathematics puzzles, they
understandably get the screaming heebie jeebies!
But rest assured, the few Arithmetical
puzzles in Scavenger Hunter can
be solved EASILY by anybody who is capable of playing any computer
game… All it needs is some simple addition, multiplication etc, of single
digit numbers.
*****
To view a typical example::-
(N.B. There are some different puzzles in this same game, which also involve 3 numbers but which do NOT involve any mathematical symbols… and hence ‘need’ no arithmetic)!
*****
Suppose your 2 symbols are + (addition) and X (multiplication), and the
3 numbers highlighted are 2, 5, and 7.
Then
there are 6 possible solutions as follows:-
2
+ 5 = 7 X 7 = 49
2
+ 7 = 9 X 5 = 45
7
+ 5 = 12 X 2 = 24
2
X 5 = 10 + 7 = 17
2
X 7 = 14 + 5 = 19
7
X 5 = 35 + 2 = 37
So
insert these solutions (and after each one the # sign) One of them will
be the solution.
You
may be very lucky and hit on the correct solution your very first try, or you
may be VERY unlucky and only your 6th attempt is the correct solution.
But no matter, the process is so quick that even in the worst case
scenario, it should not take more than a few minutes!
The
Alien Device:-
*****
This is an important and useful device throughout all of the (5) Alien
Worlds, and fulfils several functions… as follows:-
*****
To view the Alien device, in inventory you first drag the magnifying
glass onto it and then click the action cursor on it.
*****
Each of the 9 possible
Words (of which 5 only are generated in EVERY
dark blue, light blue, light green, yellow, and orange.
These same colors remain ‘permanently’ linked to their particular
Worlds… after playing a few times, you will know automatically which color
is attached to every one of the 9 Worlds.
*****
The 5 Worlds in the game I have chosen purely for illustration, are
associated with the 5 colors… yellow (
*****
Whenever you have entered a ‘new’ World
it’s a good idea to access your Alien Device (in inventory)
immediately, as described above!
You will see a red blinking star which highlights that particular World
uniquely. It is well worth noting down immediately both the name
(or a description) of that World, together with the color of the highlighted
circle and the 3 digit code associated with that particular World only…
for that particular
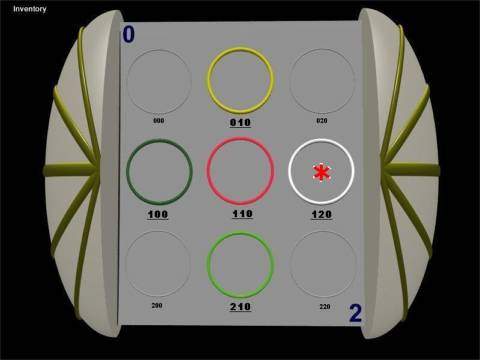
*****
The color of the circle pertaining to each specific World is
significant.
e.g. In Graphic-3
the highlighted circle
is white. This informs the player
that:-
{i}
The crystal hidden in that “White
World” (actually ‘The Farm at Night’) will be a white crystal.
{ii}
When you approach the end of your
Incidentally, there are plenty of blue fuses!
But these are ONLY for teleporting between your 5 Worlds)
When you find this box of red fuses (it may contain only one or more
red fuses… but that will be automatically predetermined for
your ‘needs’!) use your magnifying glass to view it in inventory.
Then click
the action cursor on it.
You will obtain a picture of the sort illustrated in Graphic-4,
and alongside it (in
inventory) a copy of the top portion… a “fuse rating”.
*****
The 3 digit numerical codes are actually the coordinates of a simple
matrix.
The 1st digit defines the row from top to bottom… 0, 1, 2.
The 2nd digit defines the column from left to right… also 0, 1, 2.
The 3rd digit is always zero (I have a feeling that the
Developers once thought of making this 3-dimensional… and may even do so in
the future!!!).
*****
I have superimposed the only 5 numerical codes relevant to the game in
larger underlined bold print (and of course their circles are colored).
*****
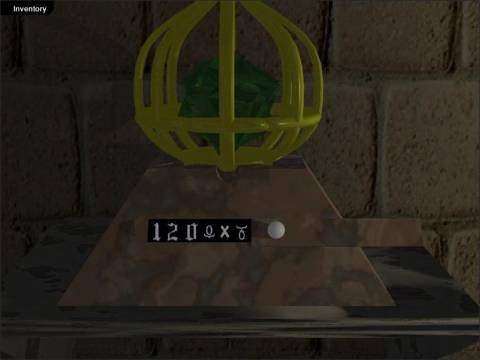
These 3 digit numerical codes designate the 1st 3 symbols of the code
which will be necessary to open the appropriate crystal cage.
e.g. In Graphic-3
the
code needed to open the crystal cage in the “White World” must start with
the 3 digits 1,2,0 followed by 3 symbols.
The
important point is, that only the code which starts with 1,2,0 which will be
found at the back of ONE random OTHER World’s crystal
cage, will be the one to open the “White World’s” crystal cage.
It will also of course display the 3 appropriate following symbols!

Graphic-4
If the color code on your fuse rating in inventory (2 short colored
horizontal lines with a short black vertical bar through them) happens to be
white (just for example, as in Graphic-4
), then the
only portal which will return you to the Alien Control Room must be in the
World of the identical color… i.e. in this case white (i.e. The
Farm at Night).
{iii}
Only the Alien Portal
IN THE WHITE WORLD (in this case) will transport you back
to the Alien Control Room. If you
try to return to the Alien
Control Room from ANY other colored World, you’ll simply be wasting time and
effort!
N.B. You can recognize these 5 Alien
Control Room portals (ONE only
in each World) as opposed to the several others, by the fact that they, and
only they, have a carpet leading up to them with yellow patterns on a red
background (sometimes this carpet is fully and clearly visible, but sometimes
only partially so!).
When you have opened up the fuse box on this (single) relevant specific
portal device, you must see a similar color code at the
top left corner… again in this case, a white one!
… Graphic-5
gives you a view
inside the portal fuse box.
You are now all set to
return to the Alien Control Room via the (only) four-colored Alien
Control Room Portal
… See Graphic-6.

Graphic-5
Graphic-6
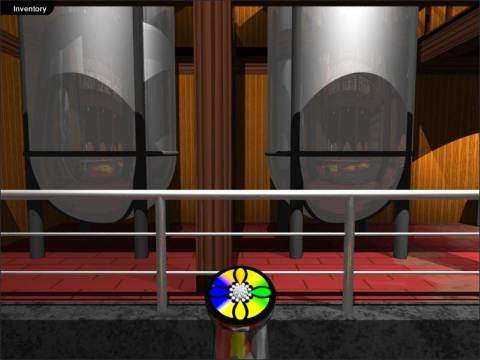
The
Crystal Cages:-
*****
These are essential in order to obtain the 5
colored crystals and (when using them properly near the end of your
There is one crystal cage ONLY in every world.
Occasionally they are accessible immediately.
But much more frequently they are protected by an outer security
protective device of some sort.
Frequently this outer security protective device is simply a metal
cage. You need to find the key or
device to unlock this. It is
always somewhere in the same world.
Again, sometimes the essential key is just ‘lying around’.
But not infrequently it is hidden inside a ‘safe keeping box’ which
will also be somewhere in the same World.
For a typical safe keeping box…See Graphic-7.

Graphic-7
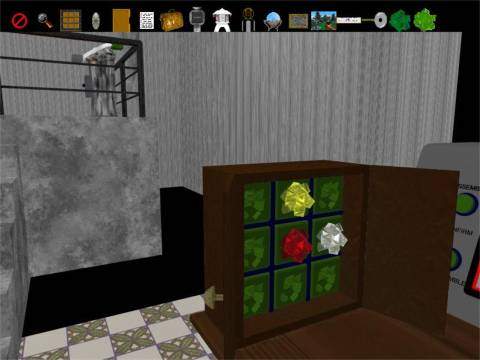
To open such a ‘safe keeping box’ in order to obtain the key inside
(which has the same color as the World and also the keyhole!) follow
these instructions:-
*****
First click on 2 of the horizontal pear shaped sectors.
The particular 2 that you have to click on are the 2 pairs of colored
edges of the rectangular box. In
the above case red and white… the order of these 2 is unimportant.
Then look up the color of the world in which your safe
keeping box is situated. You can
do that easily using your Alien Device as described above (in the text beneath
Graphic-3…
to repeat, the colored circle containing the red blinking star is the color of
your present World).
Choose that color to click on from the circular spread of 9 round
colored discs. i.e. ALTOGETHER only 3 clicks … but they must be the correct
ones!
How
to open the 5 crystal cages in order to obtain the 5 colored crystals (and
eventually receiving the 15% cash bonus!).
The
code needed to open each World’s crystal cage is to be found always ON
THE BACK of one of
the crystal cages in some other world.
Just as an example :- The back of the crystal cage in the “Dark-Green World” shows that its code there starting with the 3 numbers 1,2,0 is the only one which will open the crystal cage in the “White World”. See Graphic-8 and compare it with Graphic-3.
Graphic-8
[
4]
Return to the Alien Control
Room
***** From Graphic-6
you
are now all set to jump to the Alien Control Room,
finish your
*****
You cannot do this before you have located and set up this
(only/single) four-colored Alien
Control Room
Portal.
*****
Click the action cursor onto the (only) four-colored Alien
Control Room
Portal, and again hear the sound of thunder.
*****
Go left twice and click on the portal itself.
You will be transported automatically to the (one and only) Alien
Control Room.
There are now 2 (somewhat interlinked)
paths that can be taken:-
Route
1
~ Only if you have all 5 color crystals… and obviously
want to receive your
additional 15% bonus for disassembling/destroying the Alien Worlds.
Route
2
~ If
you do NOT have all 5 color crystals… and can’t be
bothered to obtain them all (in order to receive your additional 15% bonus for
disassembling/destroying the Alien Worlds).
Route
1
~~~ Section
A:-
*****
You have now arrived at the Alien Control Room.
*****
Go Forward twice, Left, Forward, and Left.
*****
Observe the brown cabinet with 2 doors.
*****
Open the doors and drag the 5 colored crystals from inventory into the cabinet
(where they find their own positions)!
Graphic-9
Shows the
situation where 3 colored crystals have been dragged inside the cabinet with a
light green crystal and a dark green crystal still in inventory and ready to
join the 3 in the cabinet.
Graphic-9
*****
Close the cabinet (by using the active cursor on its left
side!).
*****
Turn right, and observe the book of 4 pages of red colored
3-symbol codes at the bottom middle of the screen.
(There is a short-cut pattern recognition help here, but it is possibly
just as easy to ignore
it…
as I’m doing here!).
*****
Note (i.e. Copy) all 4 of the 3-symbol red colored codes…one (only)
of these 4 will be your next move…see Graphic
10.
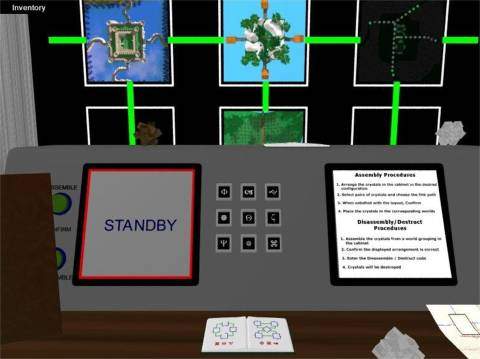
Graphic
10
*****
Read the “Disassembly/Destruct Procedures” at the lower
right corner of the screen.
*****
Click on “STANDBY” at the lower left corner of the screen
… and see it replaced by the command “Disassemble Worlds”.
*****
Click on “Disassemble Worlds… and see those 2 words replaced
by 3 new instructions.
*****
Click on the green button marked ”DISASSEMBLE”, below and to
the left of the (bottom-most) “Confirm disassembly” instruction.
*****
Enter the 4 (if necessary) sets of red colored 3-symbol codes,
one after the other (resetting each time if/when necessary).
*****
One (ONLY) of these 4 sets of red colored 3-symbol codes
will cause all of the 5 crystals to Self-Destruct… See Graphic
11
(It’s possible to hear and see this occurring inside the cabinet)!
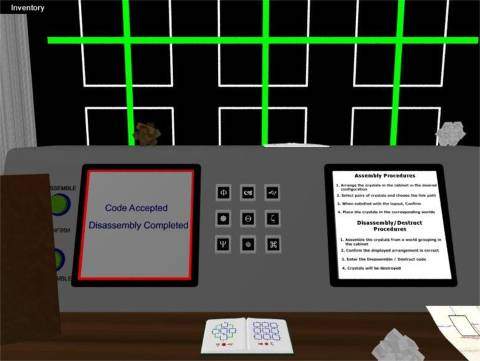
Graphic
11
~~~
Section
B:-
*****
Go (Forwards) to the Galaxy Screen.
*****
On the right-hand side is a screen with 3 worlds, each marked
with a small red square. There is
also a single white travel crystal below this screen.
*****
Click on the uppermost red square (top right corner), and see a
large ‘blue world’ appear in the screen near to the lower left corner.
See Graphic
12.
Graphic
12
*****
Click on the ‘blue world’ just mentioned above and obtain a
3 white-symbol access code… copy it down!
*****
Observe the 2 green round buttons immediately to the
left of this ‘blue world’.
*****
The lower (only) of these 2 green round buttons is active…
click on it!
*****
Go left.
*****
Pick up the blue and white travel crystal… which has appeared
on the green cube!
*****
Go right twice, forward/half-left, forward (up steps), and right
twice.
*****
Note the small green holder (platform) behind the 4 color
portal… see
Graphic 13.
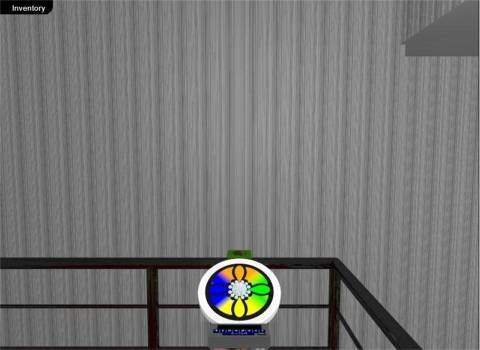
Graphic
13
*****
From inventory take the blue and white travel crystal and place
it on that small green holder… and a large 8 white-symbol code entry screen
appears horizontally across the portal device.
*****
Enter the 3 symbols you copied above, followed by “ENTER”.
*****
Click on the NOW red centered
portal device (… it was previously white, as shown above in Graphic
13 ) and hear the
crashing/thunder sound.
*****
Go left twice to the portal, and click on it.
*****
You are returned automatically to your original game-play
start-out office!
*****
Automatically, you receive
your IUIC “Welcome back” note verifying that you have COMPLETED your
mission successfully.
You have been credited with 10% of the total value of the stolen
objects you recovered (your “finders fee”), PLUS an
additional overall 15% bonus for disassembling/destroying the Alien Worlds.
NOW RETURN
TO
THE
VERY
BEGINNING
AND
START-UP ANOTHER
(DIFFERENT) MISSION
!!!
~~~~~~~~~~~~~~~~~~~~~~~~~~~~~~~~~~~~~~~~~~~~~~~~~~
Route
2
~ If
you do NOT have all
5 color crystals… and can’t be bothered to obtain them all (in order to
receive your additional 15% bonus for disassembling/destroying the Alien
Worlds).
Route
2
~~~ Section
A:-
Since you do NOT have all 5 color crystals, you CANNOT DISASSEMBLE/DESTROY the Alien Worlds, and hence Section A is totally redundant and cannot be used here!
Switch
STRAIGHT to:-
~~~
Section
B:-
*****
You have now arrived at the Alien Control Room.
*****
Go forward, right twice and forward, to the Galaxy Screen.
*****
On the right-hand side is a screen with 3 worlds, each marked
with a small red square. There is
also a white travel crystal below this screen.
*****
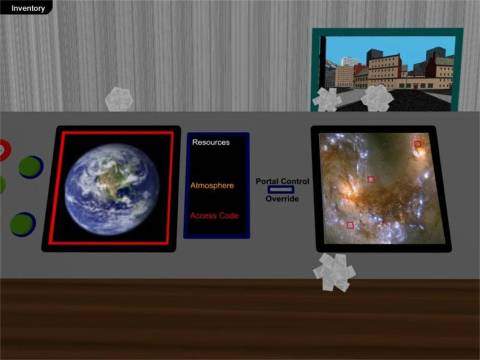
Observe the “Portal Control Override” slot to the left of
the Galaxy Screen.
*****
Click on this and obtain the info for obtaining a portal
override card as an essential forerunner to obtaining a travel access code (in
THIS case).
*****
Click on the white crystal below.
This causes the portal control override card to appear in your
inventory.
*****
Click on the uppermost red square (top right corner), and see a
large blue world appear in the screen near to the lower left corner.
See Graphic
12… but
in this case you obtain (to the right of the ‘blue world’) an instruction
as to how to use the portal override card in order to obtain a travel access
code!
*****
From inventory take your travel access card and insert it into the portal
control override slot!
*****
Click on the ‘blue world’ (mentioned above) and obtain a 3
white-symbol access code… copy it down!
*****
Observe the 2 green round buttons immediately to the left of
this ‘blue world’.
*****
The lower (only) of these 2 green round buttons is active…
click on it!
*****
Go left.
*****
Pick up the blue and white travel crystal.
*****
Go right twice, forward/half-left, forward (up steps), and right
twice.
***** Note the small green holder (platform) behind the 4 color portal… See Graphic 13 .
*****
From inventory take the blue and white travel crystal and place
it on that small green holder… and a large 8 white-symbol code entry screen
appears horizontally across the portal device.
*****
Enter the 3 symbols you copied above, followed by “ENTER”.
*****
Click on the NOW red centered portal device
(… it was previously white, as shown above!!) and hear the crashing/thunder
sound.
*****
Go left twice to the portal, and click on it.
*****
You are returned automatically to your original game-play
start-out office!
*****
Automatically, you receive
your IUIC “Welcome back” note verifying that you have completed your
mission successfully.
You have been credited with 10% of the total value of the stolen
objects you recovered (your “finders fee”), BUT
NO additional overall 15% bonus this time since
you did NOT acquire all 5 crystals and hence did not disassemble/destroy the
Alien Worlds.
NOW RETURN
TO
THE
VERY
BEGINNING
AND
START-UP ANOTHER
(DIFFERENT) MISSION
!!!
GameSolves
http://www.gamesolves.us.tt/
Forum
http://pub24.ezboard.com/bgamesolves
