Voyage: A Journey Beyond Reality
by Kheops Studio
Walkthrough by MaGtRo & Dennis Lepine August 2005 version 1.2
Gameplay: This point and click game is played with no CD on the drive after installation. The main menu has New game, Save game, Load game, Credits, Options and Quit. The options menu has rendering, speed, subtitles, object information and volume selections. The return to previous page is an X at bottom right of the screen.
Right click during gameplay brings up the gameplay menu. The 'menu' brings up the main menu to save, load, options and quit. The log is information taken during gameplay. The puttering about shows the combination of items done during the game. Ideograms are translated glyphs seen during gameplay and Investigation is made up of pictures that describe the discussion of the actions done during gameplay.
To save game, click on menu and then select 'new save' or an old saved game to be overwritten.
The inventory has several frames of squares to hold items picked up. Click on tab on top of each frame to open another set of inventory squares. The transit area on the right holds all items taken and when Auto is pressed the items are automatically placed on inventory squares at the center. You can then arrange the items on different frames the way you want them. The assembly area at middle of screen is where a new item is made from the combination of 2 or more items selected from the inventory squares above. The red button on the left is used to discard an item in a container. The bottom frame describes items selected and their usage. It is helpful to check the items to know how to use them in the game.
Click on the ? button below Ardan to be reminded of the objectives in the game. The game is forgiving with retries when the character dies.
Note: This game is non-linear. You can do the puzzles and exploration in the order you want. The walkthrough below is arranged by progression of the objectives. There are actions that can be done but might not be described below.
Moon Trip
Michel Ardan comes back from consciousness but his memory is clouded.
Objective: I will understand where I am and what I'm doing here or I'm not Michel Ardan.
Discussions 1 - 4: Click on man on lying on left bench and see that it is Barbicane. Click on man lying on the right bench and see that it is Capt. Nicholl. Click on the newspaper clipping above Nicholl and listen to how all 3 men went to space to go to the moon. Click the wrench on wall left of newspaper clipping.
Discussion 5: The short strap holding the wrench is in inventory. Pick up wrench. Use the wrench on the bolts of the porthole on the floor. Find out that you are in outer space.
Objective: My instinct is warning me of danger and this sort of intuition has rarely been wrong. I've got to figure out where the problem lies.
Discussion 6: Click on Barbicane (now has blood on blanket) and see that he's dead. Read the torn letter Barbicane is holding in his hand. Pull back and check Barbicane's wallet on his coat pocket. See a letter by Diane Moon.
Objective: Find out what happened and why Barbicane was shot.
Take carriage key that fell on the floor. Use carriage key on cabinet above Barbicane. Take the book at middle left - Ideograms by Diana Moon.
Get more air in the shell: Take the bag of Chlorate of potash behind the book in the cabinet. Go to the other side of the shell. Click on wired bowl to move it away from flame. Click to open bowl and place chlorate of potash on bowl. Place bowl back over the flame.
Note the oxygen, carbon dioxide and temperature gauges on the wall. There is a water faucet and sink on the left. Note that the oxygen level is midway and temperature is at 52 degrees. Look down and take the can of potassium and the funnel over the tank of potassium hydroxide. Combine can of potassium and funnel by clicking on them in inventory to get can of potassium with a funnel. Open the cabinet and take small knife from bottom left shelf.
Discussions 7-8: Take Barbicane's hat. In inventory, use the small knife on Barbicane's hat and read Diana's letter.
Discussion 13, 15: Click on Nicholl and see him dead holding a shotgun. The shotgun is now useless since the barrel is warped from the last shot. Take the shotgun. Click on Nicholl's face and smell bitter almond. Click on Nicholl's wallet.
This event can happen anytime after checking Nicholl. The shell comes close to the moon and the gravitational pull caused weightlessness. The potassium droplets came out of the tank under the control panel.
Collect potassium droplets from shell: If you haven't done it yet - combine the funnel and can of potassium found under the wall control panel. Move the can of potassium with a funnel over the droplets. No need to click it on drops. Automatically seal the tank of potassium and get an empty can and funnel in inventory.
The shell has drifted to the back - dark side of the moon.
Discussion 11: Open the rollup cover at bottom right of the cabinet and see 2 wineglasses and wine cask.
Discussion 12: Open the cabinet and click on CN (cyanide) bottle.
Discussions 14, 9, 10: Click on rooster by the sink. Take the burnt paper close to the rooster.
Read burnt paper: Move the wired potash bowl off the flame. Click the knob to lower the flame to the smallest - yellow (no blue) flame. Click the burnt paper on the flame and read the letter.
More oxygen needed - If the oxygen level goes down - raise the flame to burn more potash.
Discussion 16: Try to take the glass on the right of rollup shelf in the cabinet. Discussion done.
Meteor passage altered the trajectory and showed a hidden face on the moon.
Objective: Land on the moon by slowing down descent. Start the retrorockets and lighten the shell.
Prepare the retrorockets: Take the red loaded retrorocket and blue spent retrorocket from middle bottom of the cabinet. Take also the cartridges and powder barrel. You can get explosive powder 2 ways: Use the small knife on the cartridges or use the wrench on the powder barrel.
Use explosive powder on blue spent cartridge to get blue loaded retrorocket. Look down on the porthole and click open the red and the blue covers. Place the red and blue loaded retrorocket on their respective colored holes.
Space funeral for Barbicane and Nichols: Click twice on raffia at middle shelf of cabinet. Click raffia on the blanket of Nicholls. Take Nicholl's body and the can opener under Nicholl's body. Click on right handle of porthole to open the porthole. Take Nicholl's body and click on the open porthole. Do the same for Barbicane.
Lighten the shell up: Press the central button to ignite the rocket. If the rocket is not lightened up quickly enough the shell crash lands on the moon and Ardan dies. You can lighten the shell first before you press the central button to ignite the rocket.
Use the wrench on the bolts of the 2 side portholes. Climb the ladder and turn around to look up on the porthole at the ceiling of the shell. Use the wrench on the bolts of the central top porthole.
Click the porthole to open and throw out any items that can be thrown on the open porthole. Don't worry; they will be picked up later on the moon.
The shell lands on the moon in an area surrounded by blue snow but rolls down at the edge of a precipice. Ardan realizes there is no air outside. When sun comes, the blue snow melts and makes a heavy atmosphere.
Explore the crater and climb the surrounding mountains
Open the porthole to have air. Before you leave the shell, open the cabinet and take all you are able to take. Look around and see the damage done to the shell.
Shell landing Area: Exit the shell and see the colorful plant life. Note the stone holding the shell from falling down the precipice. An insect buzzed around Ardan. Take green fruits of the Strangulica (strangling plant) and note the red Gladiata plant (sword plant). Go to the edge of mountain. Turn around and take yellow fruit of Mephita (suffocating plant) from the ground.
Central part of the crater and plant life:
Leaping to another point - Click at the exact moment the moving cursor is in the green zone of the bar. Just keep on clicking and you'll get there. Once you have leaped towards a place, you do not need to go through the moving cursor puzzle. You can just click to that place.
Going left from shell landing area:
First corner - See-click on Sagittaria (purple with red flowers stinger plants) and Strangulica (green strangling plants).
Second corner - See-click on Gladiata plant (red sword plants) and Sagittaria (purple with red flowers stinger plants).
Third Corner - See-click on Voracia (blue carnivorous plants) and Gladiata plant (red sword plants).
Fourth Corner - See-click on Voracia (blue carnivorous plants) and Mephita (yellow suffocating plants). Take note of the shape of the plants. At the landing area here that looks like a slingshot (2 spikes), look across and see a cave on the cliff.
Fifth corner - See-click on Strangulica (green strangling plants) and Mephita (yellow suffocating plants).
Center of crater - Leap from any corner landing area towards the center of the mountain.
Top level - Take the shell discarded item. Look at the 2 water ponds and 2 telescopes (one broken). Take 2 lunar coins by broken telescope. Check the 2 panels with red squares. Take lunar reeds beside a panel with red squares.
With coin in inventory, click on working telescope's slot. Automatically look through the working telescope and see a creature in front of building above the clouds. Click on the ideograms on the telescope - coin and to see.
Lower level - Go down the opening at lower end of the mound. See a jammed fanlike structure. Take yellow fruit, lunar potting soil, lunar raffia and dead branch around the area. See an organ setup on the wall. It needs air and water to function. A closed door is at one wall.
Turbine area - Climb stairs and see air and water control valves. The turbine fan is not working. A skull panel and a standing panel are on the other wall.
Open new stairs - Look close at standing panel beside a closed door.
Click the handles to slide the bar that closes the cover of the panel. Pull back from stand resets the puzzle.
Click left handle 2xs, right 2xs, left 1x, right 2xs. Turn the switch to see a new set of steps.
Go to highest point of the central area (blue drawing on ground) and jump to any corner.
Cliff cave: Leap to the cave on the cliff from the fourth corner's landing area - the one that looks like 2 spikes.
See 2 metal containers that show 2 new ideograms, lava-fire pool, water pool and fertile soil. Take 3 lunar coins and catch floating blue fruits. Note the ideogram on wall. You can open a can of food and click straight on Ardan or heat it on the fire when placed in the pan.
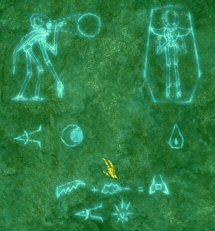
Collect ideograms and note aggression and harmony of plant life.
Cave level - Click on the ideograms of the metal containers to enter it in the book - fire and water.
Pan right and see unknown ideograms on cave wall. Note the ideograms above the plant drawings. The comb-like ideogram is for the blue plant and the lines are for the purple plant. The arrow must mean aggression. Blue plant is aggressive to purple plant. See that the blue destroys the purple plant.
Pan little to the right and see steps on the cliff side. Leap to those steps.
Second set of steps - Purple (lines ideogram) plant is aggressive to yellow plant (wavy line spike).
Third set of steps - If you need more, take blue fruit. Yellow plant is aggressive to red plant (sword ideogram).
Fourth set of steps - Red plant is aggressive to green plant (2 parallel line ideogram).
Fifth set of steps - Green plant is aggressive to blue plant.
Harmony of plants: Pan left and see the view of the crater with the aggressive plants and note the color of plants that can be close together.
Look down and see a gear puzzle - we can do that later. Turn around, climb steps and see a creature with green and purple plant on his shoulders. Give him fruits and see which one he likes - yellow and blue fruits. You need to prepare a delicacy that the creature will like.
Plant life and Creatures
Scare the plants to gain access to the area: Based on the drawings and ideograms seen, graft the appropriate seedlings from fruits that will scare the pair of plants in each corner of the mountain. Go to central part of the crater to get more potting soil or raffia.
1. Grafting of plants:
Seedling - Take a fruit and then click it on potting soil to produce a seedling. Make seedlings of available colored fruits. Fruits in inventory are yellow, blue and green.
Grafting - Click on 2 different colored fruit seedlings and they will go to the assembly area. Add a raffia (lunar or earth) to produce a grafted seedling.
2. Go to the pair of plants in a corner of the crater that is scared (based on ideograms) by the grafted plant made. Click the appropriate grafted seedling on both plants.
3. Enter the area of the scared plants and take items in those areas.
Grafted seedlings Pair of plants to be scared in mountain corner Items that can be taken in that area yellow + green red with blue blue fruits, red fruits, possible shell items blue + yellow purple with red red fruits, purple fruits. Area blocked by creature. red + blue green with purple green fruits, purple fruits. Area blocked by creature. green + purple blue with yellow blue fruits, yellow fruits, possible shell items. purple + red yellow with green yellow fruits, green fruits, possible shell items.
Cool down the creatures: Based on the ideograms above, make a compote from fruits that the plants on shoulders of the creature can dominate or scare. Take a fruit and click it on Ardan and he will describe how to make a compote.
1. Feed creature a compote mixture of fruits that the plants on their shoulder are dominant on.
2. Preparation of compote - Combine 2 fruits together and the pan. Heat pan with fruits in lava pool in cliff cave.
3. Look around the area where the creature blocked.
Creature's plants on the shoulder Creature found at: Compote fruits to be prepared Items taken from area Blue and yellow Purple-red plant area purple + red viscous secretion, possible shell items. Blue and red Green-purple plant area purple + green viscous secretion, plugged conch shell, possible shell items. Green and purple Cliff top blocking door blue + yellow viscous secretion.
Mountaintop
Get through the door that blocks a mountain pass:
Note the drawing on left wall - a creature carrying a gear. Note the colors of the plants on the crater.
Make 2 gears with plant colors that are in harmony.
1. Go to fifth level from cave or just below the steps to the locked door. Look down and see a circular metal.
2. Click on each triangular panel of the gear to see the colors of the plants
3. Cycle the colors to match the arrangement of the plants on the mountain. Take the first colored gear.
4. Make another gear with similar colors but in reverse position. Take second colored gear.
5. Place either one of the gear on gear setup left of the locked door. Click on handle.
Enter the Necropolis:
Note the unknown ideogram at the base of the wall: Blue + yellow = food; see, unknown ideogram.
1. At the cave, prepare compote of blue and yellow fruits. Click glass on water to get glass of water.
2. Go back up to the closed gate at top of mountain. Then click the prepared blue-yellow compote on Ardan's character in inventory screen. He eats the compote and his vision turns green. Look on the ideogram right of the grilled gate again (what do you know) and see hidden ideograms.
3. Go to panel left of the grilled gate and press on the 3 ideograms - see, earth and death (any order) seen after eating the compote. The gate rises.
Necropolis: Inside the Necropolis, click on the ideograms on the floor and they will be entered in the ideogram book - earth, death-terror. Look around. Drink the glass of water if you want to remove the green view effect.
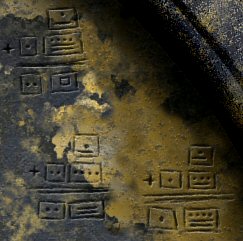
Go to the end of the hall and look at sarcophagus on left. Use can opener on tin can sarcophagus. The can opener broke. Look at inscription on base of the opened sarcophagus. They will be entered in the log. Take the iron bar, Selenite key, lunar tool and leak proof globe. See an unknown ideogram beside the water ideogram.
Go back to gate. Use the iron bar on sarcophagus left of the gate. Human bones! Take gold necklace, damaged flute and damaged mechanical arm.
Exit Necropolis: The inscription at the sarcophagus shows the number of the points of the geometric shapes beside it. Check log book for the inscription. A dot is one point and a bar is 5.
1. Look at the panel right of the gate. There are geometric shapes. Some shapes have lit green lights below them. Green light means addition. Later, you will see red lights are subtraction, blue lights are multiplication and yellow lights are division processes.
2. Add the number of points of the shapes that have green lights. Then click on the shape that has number of points resulting from the sum of those lit shapes. This is a random puzzle.
3. If correct, the ball cover will slowly open. Do this until the ball is completely opened and the gate will rise.
Number of points on the shapes 8 3 7 10 6 9 11 5 4 12
Learn about Lunar civilization
Find hidden Selenites:
Place the second colored gear on panel left of the locked door at top of the cliff. Click on lever. Go down the steps and look at metal men on wall. Check the transmitter room with smashed parabolic mirror and broken machine. Pick up ax(le) and hopper.
Go back to elevator by the steps. Press the button to call elevator. Use Selenite key on top keyhole of the elevator. Go down to middle level and be brought to Selenite dignitary. Learn about your insect spy, starting score, space cannon and challenge. Read the notes on the log how to get back to earth.
Request bell: Click on button on the left of the counter and hear an explanation for getting keys. Intelligence required for Level 1 key is at least 200. Press the button on the left where the dignitary is standing for level keys and ask for level 1 key. You need to at least understand written and spoken Selenite to get a level 1 key.
Learn to read Selenite:
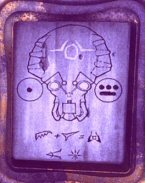
Study the Ideogram book and remember the deduction of the unknown ideograms already seen.
Press the button below the dignitary. Select the meaning of the ideogram shown. This is a random puzzle.
My game showed ideograms: Conquer, air, empty, light, gloom, hunger, moon, purple plant, blue plant, red plant, green plant, yellow plant.
Learn spoken Selenite:
Ask about the machine on the left wall.
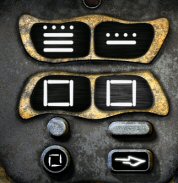
Find the buttons with matching sounds from left and right panel. This is a random puzzle.
When a button on the left is pressed and the matching sound button on the right is immediately pressed, the buttons remain lit.
Match-light all buttons. You can redo the test to increase your score. You have 4 chances but as you redo more, the less forgiving the puzzle becomes.
Level 1 key: Press the request bell and ask for level 1 key. Take level 1 key. Intelligence required for level 2 is 300. If you have enough points ask for level 2 key.
Distributor: Check the machine on opposite wall from the sound test. You can buy several items here. Money can be obtained by selling items to the dignitary. Be careful what you sell, you can buy them back but at a higher price from the distributor. Sell only items that you don't need or can be replenished from a source here in Luna. I sold the dented shell porthole, can, rifle, seedling and grafted seedlings.
Go to elevator and take the level zero key and use the level 1 key.
Learn math processes:
Go to second from top (enter) level. Go forward to panel on wall at left end of hallway from elevator by exploding mushrooms. Look down and note the number - bar with one dot.
The reading of the numbers is learned from the sarcophagus inscription (see log). The math process is seen etched left of the panel in close up. Read the log book for more explanation.
Reading numbers: bar = 5, dot = 1, square is a column of the addition process. The Selenite's math process is base 20. So any sum 20 or over is carried over to the left column. Ours is base 10, we carry over to the left anything 10 or over.
Examples from left top:
6 + 1 14 ---- ---- 1 20 Base 20 will carry over the 20 at right column to left column to make: 2 0 Example at bottom left:
6 + 2 4 --- --- 2 10
Example at bottom right:
6 + 1 8 --- --- 1 14
Get the sum of the number on the floor - bar with one dot (6) to the numbers shown on the panel. This is a random puzzle. A dot is 1 and a bar is 5. The panel has 2 squares with fixed numbers. Think of this as a 2 digit number in 2 columns. Add 6 to the right column number.
The result is entered by clicking on the right middle column and then press the dot button or the bar button.
Then click on the left middle panel to select it. Enter the sum of the left column - take note if there's a carry over from the right column. If the sum of the right column is or exceeds 20, that 20 is carried over to the left column as one dot. Then press the enter arrow button. The zero button is the reset button.
Example of a game puzzle:
Number from panel 19 9 Number from floor 6 --- --- 19 15 to be added on middle squares 3 bars
4 dots
3 bars
If correct, a green light is seen and the panel opens. Click on switch and the door on the left opens.
Look around the Selenite Settlement
Second from top (Enter) level: See exploding mushroom at left end of hall from elevator.
Giant fanlike scale to open door - Click on one red button to move the cursor to that position. Your weight as one person on the floor scale opens the door to the ground level. If 2 creatures stand on the scale, the scale cursor will be on 2nd position from zero.
Other end of hall - See yellowish Chlorine gas at other hallway which makes it not passable.
Third from top (Food) level:
Kitchen - Turn right and see food preparation vat. Click on the ideogram over the mixing vat - conquer, hunger. Pan right and see the switch for food or water going to distribution pipes. Water and fire bowls are on floor. Various fruits are on bins ready for the taking. Take the shovel at the corner and the cogged cylinder on the recessed area.
Experiment on making compote - Combine 2 fruits and add to pan. Heat on fire and click it on Ardan. Drink a glass of water to remove effects.
Red + blue compote gives purple vision. Yellow + blue compote gives green vision. Green + yellow compote makes Ardan 'feel splendid'. Purple + green compote solicits no comment. All the other combinations are revolting mixtures that Ardan can eat or discarded.
Go to other end and talk to the creature. You can understand but not answer.
Second from bottom (light) level: The insect spy talks to you. Whenever he blinks, it means that you can raise your score by doing an action on a machine. He will explain things.
Open the laboratory door:
Look down and see one dot on left square and 2 dots on right square on the floor. Look close on the panel on the wall.
Add 2 to right column number on panel and 1 to left column. Remember a bar is 5 and 20 carries over to left column.
Flip the switch to open the lab door.
Laboratory: Enter and see water and fire bowls, potting soil, raffia, scale for separating isotopes and the purifying machine. Click on safety valves of the purifier and note that it needs grease or oil. Click on the 2 procedural tablets on both side of the purifier. The drawings will be placed in the log. Study log.
Lumen production area: Go to the room across the lab. Try to talk to technician-creature. Note that he takes food constantly from his food tube. See various items and chemicals that he would not allow access to.
Talk to creatures to learn more information
Buy glue and parts: Sell items to dignitary at 'see' level to get money. Sell 1 can, twisted plating, rifle, fruit seedlings and several fruit seedlings hybrids. Buy Yrshnouff gluance (glue) for 190 lunar money, mechanical hand for 40 lunar currency and mechanical elbow for 40 lunar currency from distributor.
Fix flute: Combine damaged flute, lunar reeds and glue to make an ancient flute that makes you speak Selenite.
Ask for level 2 key: If you have enough points (300+), ask for level 2 key. Talk to the Supreme Ruler. Take the level 2 key. You have to return the items taken from Necropolis Selenite sarcophagus.
Talk to Creatures:
Scurvy, the Insomniac - Talk to Scurvy, the insomniac. Learn about the exiles, plant association, etc... Check the log for more information. He wants you to solve his logic problem before he helps you with the shell.
Select the appropriate answer to questions based on:
Logic 1 - When facing the sacred artificial jaw of Selenos the First, every lunar inhabitant must crack his nasal cartilage as a sign of respect. On every other occasion, proper etiquette absolutely forbids making that sort of noise.
Logic 2 - When the Supreme Ruler, Master of all that lives in our hospitable caves, blinks his frontal ommatidia, all lunar citizens present light up their cerebral lobes as a token of approval and respect.
When the logic questions are correctly answered, Scurvy gives instructions (check log).
Bust of Supreme Ruler - Use the level 2 key on keyhole left of panel by Scurvy. See the bust of the Supreme Ruler. Click on it and it falls off and breaks. Take the shattered bust (lose points). Fix the shattered bust with glue to make reassembled bust and score points are back to what it was.
Lose-gain points - Look at shattered bust in inventory and note that one part makes sound. Use a wrench on bust and find salt behind the nose. Use glue on shattered bust to get repaired bust. Place bust on stand and you will gain 10 additional points before the dropping of the statue.
Scrupul, first rank technician - Talk to the technician at the lumen producing room across the laboratory. Learn all about the making of lumen and what items are needed.
Collect items
Get more items:
Make the creature feel splendid or frenzied: Go to kitchen at food level and prepare the compote that made Ardan feel splendid: Green + yellow compote. Click the green-yellow compote on the food vat to be distributed to the creatures through their food tubes. Talk to the creature at the other end of the hall and he is in a frenzy.
Go back to the Scrupul, creature at the lumen production level. He is very busy. Use empty can on the yellow azotic acid vat. Take enough blue ores and shovel. Open the cabinet at other wall and take globe, cogged cylinder, handle, belt and ax(le).
Belbaab conch: Combine azotic acid and plugged conch in inventory to get Belbaab conch that enables understanding all creatures.
Get more azotic acid using the empty can.
Go to kitchen and turn the distribution pipe to water. This clears up the effect of the compote given to the 2 creatures.
Shell at landing area: Leap to snow covered area on the surrounding mountain. See a green plant holding the shell. Use any seedling graft that has red seedling to scare it. Enter the shell and talk to the rooster.
Horticultural sideline: Make blue fruit seedling. Combine that with the earth vine plant and raffia to make Voracia-grape hybrid. Plant the hybrid on fertile soil at the cliff cave to see a grape vine grow on the side of the cliff. Take lunar grape. Climb the vine to get up the cliff to the top.
Elevator Keys: Use only one key on the elevator and keep the others in inventory. If you leave 2 keys on the elevator, Scurvy, the Insomniac might confiscate the level 0 key. The key is on the shelf by his cubicle. You can get it back, by getting him drunk.
To get Scurvy drunk: Make a blue fruit + lunar grape + pan compote. Place the Voracia-lunar grape compote on the food vat in the kitchen.
Talk to Scurvy. Take the key from shelf and Scurvy will talk to you but since he is feeling 'generous' at the moment, he will let you take the key.
Scrupul - Check Scrupul and see that he is also hic! Hic! Now you can ask him and he will respond and give you great clues without payment at all.
Ardan - Make a Voracia-lunar grape compote and click it on Ardan and see how the game manipulation is now jerky. LOL! Drink water to remove effect.
Fix mechanical arm: In inventory, use lunar tool on broken mechanical arm to get mechanical forearm, upper arm and corroded parts. Combine forearm, upper arm, bought hand and elbow to make mechanical arm.
Catch exploding mushroom: Use your hand to catch an exploding mushroom at second from top level of the settlement. Just have patience and place the hand cursor in the path of a dropping mushroom. Then combine the mushroom with the leak proof globe in inventory quickly to get mushroom spores. To make it easy, prepare a green + yellow compote and give it to Ardan character. He feels so splendid that he moves fast and can easily catch the mushrooms.
Get salt:
Skull panel: Go to the skull panel at turbine room accessed via the stairs (close to organ puzzle) at ground level outside. See the ideogram at the bottom is blue + red fruit = food. Prepare a blue + red fruit compote. Click it on Ardan and see that the vision changes to purple. 'I feel weird'. Look at the skull panel and see hidden numbers. What do you know? Drink water if you want to clear your vision.
Water panel with red squares: Go outside to top outside level and look at left red squares water panel with ideograms. Click on a water ideogram in each row. The panel opens. Flip the switch to point to the left, towards the red numbered squares panel.
Do the same to the other red squares water panel with ideograms at the other side of the mound. Some ideograms are erased. Click on the buttons: From top to bottom, left to right: 1, 3, 4 and 2. Flip the switch to point to the right, towards the red numbered squares panel.
Numbered red squares panels: Based on the secret numbers seen on skull panel while in purple vision, click on 1 dot to raise the cylinder one level at red numbered squares panel by the reeds.
Go to the other numbered red squares panel. Raise this to 8 levels by clicking on squares.
Number the squares 1-3 and 4-6, left to right and top to bottom. Click on 1 4 2 4 3 4 5 4. What do you know?
Go back down to the skull panel (What do you know?) and take enough salt from the opened panel.
Make chemicals on purifier
Based on journal clues, prepare chemicals using the purifying machine in laboratory.
Fix purifying machine: Place belt taken from cabinet at lumen processing room on right wheels of purifier. Place shovel at opening at bottom center. Place leak proof globe on top left of machine. The machine still needs grease.
Make grease: Follow the log graphic clues.
Combine purple fruit + red fruit + pan. Heat on fire.
Place compote mixture on bottom part of the purifier.
When the vents would not open, use the mechanical arm on vents that has red residue to click them open.
Take Zubroo concentrate. Add viscous secretion to Zubroo concentrate to make Zubdssik greasy amalgam.
Use grease on one of the purifying machine's vents.
Make glue: Follow the log graphic clues.
Combine purple fruit + green fruit + pan. Heat on fire.
Place compote mixture on bottom part of the purifier.
Take Yrsagtt concentrate. Add viscous secretion to Yrsagtt concentrate to make Yrshnouff's gluance (glue).
Make Xuldakir's Star that makes a creature small:
Make green and purple seedlings. Graft the 2 seedlings together with raffia. Place in purifier.
Take Xulmi crystalline powder. Add salt to Xulmi powder to make Xuldakir star.
Make explosive mixture: Make 2.
Make purple and red seedlings. Graft the 2 seedlings together with raffia. Place in purifier.
Take Prultuuk's crystalline powder. Combine the powder with exploding mushroom spores to make Prulmis' explosive mixture.
Top level - transmitter room:
Fix the lumen preparation machine : Based on what is learned from Scrupul about the machine, fix the machine at top level at the transmitter room.
Make and take a new colored gear from below the stairs outside.
Combine colored gear + cogged cylinder + ax(le) = crushing roller. Place crushing roller between the other 2 at left side of machine.
Place hopper in front of crushing rollers. Place blue ore on hopper.
Place funnel on pipe above the crushing rollers. Pour azotic acid on funneled pipe.
Place handle on rightmost panel.
Place glue on 2 open pipes, one is below center.
Grease the central bolt at center of pump.
Pull handle. It works!
Use empty can on trough that has blue liquid left of the panel with the handle to get lumen
See the crusher at middle of machine. You can use this to straighten out the crushed porthole cover of the shell. Thanks, fov.
Make Borzludjak oxygenizing preparation:
Place purple fruit in purifier in laboratory to get Brozlyzz concentrate.
Brozkyzz concentrate + blue fruit + lumen = Oxygenizing concentrate. This can be used as replacement for Chlorate of Potash for the trip home.
Tip shell over the brink
Lowest (secret) level - Hall of secret antiquities: Use level 2 key on elevator. Go to lowest level.
Become small: Place Xuldakir's star on machine. Automatically be small and run to the other side.
Pull lever left of main door to open the door. Look around and take mechanical hand and mechanical elbow. Take the painting = Tunnel of Communication. Look at the painting in inventory and learn that it still holds a secret.
Take broken mirror. Look at the inscription on the pillar. It is entered in the log book.
Klipsaggt machine: Based on the formula (check log) for painting the shell to lighten it we need 3 measures of the Essence of Klipsaggt, pink liquid.
1. Place the empty can on the left stand.
2. Turn the top handle of right contraption. This fills the tank with 9 measures.
3. Using the middle panel with arrow going left lit, press button to fill the can with 4 measures of essence. Leaving 5 measures on the tank at right. Use the bottom handle on the left to empty the can of essence.
4. Press middle button again to place 4 measures on can and leaving 1 measure on right tank. Use the bottom handle on the left to empty the can of essence.
5. Press middle button to move the 1 measure from right tank to empty can on the left.
6. Turn the top handle of right contraption to fill the tank.
7. Using the middle panel with arrow going left lit, press button to fill the can with essence. Leaving 6 measures on the right. Use the bottom handle on the left to empty the can of essence.
8. Press middle button again to place 4 measures on can and leaving 2 measures on right tank. Use the bottom handle on the left to empty the can of essence.
9. Press middle button to move the 2 measures from right tank to empty can on the left.
10. Turn the top handle of right contraption to fill the tank.
11. Using the middle panel with arrow going left lit, press button to fill the can with essence. Leaving 7 measures on the right. Use the bottom handle on the left to empty the can of essence.
12. Press middle button again to place 4 measures on can and leaving 3 measures on right tank. Use the bottom handle on the left to empty the can of essence.
13. Press middle button to move the 3 measures from right tank to empty can on the left.
Take the can with 3 measure of Essence of Klipsaggt.
Alternative shorter solution from manxman:
Fill the can using the left side which gives 4 measures, then emptied that into the one on the right. (now 4 on the right)
Repeat this again. (now 8 on the right)
Repeat again. ( this leaves 3 measures on the left and 9 on the right)
Laboratory:
Prepare the lightening paint: Look at the log for the procedure.
1. Make a purple seedling. Place purple seedling in purifier to get Klipsgaal's isotopes.
2. Isolate the lightest Isotope:
Place Klipsgaal isotope on the machine at other side of the room to separate isotopes.
In 2 weighing only, isolate the lightest isotope. = means both tray are equal weight, > means the left tray is heavier and < indicates the right tray is heavier.
1. Take 2 isotopes and place it on left tray. Take 2 isotopes and place it on right tray. Weigh by clicking on middle button.
2. Place the remaining isotope evenly on the tray. Take the lightest Klipsgaal isotope.
Alternative solution from manxman:
With 9 isotopes to compare, place 3 on each side and compared (leaving 3 left). That identified which group of 3 contained the lightest isotope.
Then place 1 on each side of the machine leaving 1 remaining. The lightest was easily identified then.
Shell at landing area: Leap to snow covered area on the surrounding mountain.
Combine isolated Klipsgaal isotope + blue fruit + 3 measures of Essence of Klipsaggt = Klipso' lightening agent.
Use the Klipso lightening agent on shell. If you wait too long before using the lightening agent once it is prepared, the agent will dry up, you will feel light and you have to restore the dried paint. To restore the dried paint, heat it in fire. (Thanks, manxman).
Once the shell is painted, use the iron bar on stone holding the shell. The shell falls down underground.
Help moving the shell to the cannon
Cannon: Go to second level from top using the elevator. Go to the room opened across the exploding mushrooms. Close the left door by pulling the left lever. Open the right door by pulling the right lever. Enter the next chamber. See the cannon chamber.
Explosive charge: Turn around from the cannon and see a tray to place the explosive. Place the Prulmis' explosive material or explosive powder from barrel (or cartridges) on the tray.
Go to outside to the organ setup at below ground level of mound. Use grease on the fanlike scale door opener. Click on red button 1 to move the cursor. The explanation about the scale door opener is in the log.
Call the exiles:
Get water flowing: Go to water ponds at top level of mound outside and move the handle of the water control stands to point towards the inside of the mound. Do this to both water control stands. Go to the turbine room below and turn the handle to allow water to flow.
Get air to flow: Turn the handle that has air ideogram to start the turbine.
Use the organ: Go to the organ puzzle at below ground level of mound. Read log for clue on how to call the exiles. Look at chart on left and see 3 set of colors to call: Blue-yellow, Green-pink and blue red. There are 13 pipes on the organ. Each pipe has an ideogram. Call them by the colors of the plants on their shoulder using the turbine organ. Reproduce the sound of their answers using the organ.
Number the pipes left to right 1 - 13. Press the pipes in order at chart below.
Hint: Insert the level 2 key left of the chart and when you press the colors, the next pipe to be pressed lights up.
Blue - Yellow Exile. Press: Green - Purple Exile. Press: ?Purple? - Red Exile. Press: 5 10 - hear an answer 8 3 - hear an answer 3 6 - hear an answer 5 10 13 12 - hear an answer 8 3 1 12 - hear an answer 3 6 13 12 - hear an answer 5 10 13 12 12 - hear an answer 8 3 1 12 12 - hear an answer 3 6 13 12 12 - hear an answer 5 10 13 12 12 13 - hear an answer 8 3 1 12 12 1 - hear an answer 3 6 13 12 12 13 - hear an answer 5 10 13 12 12 13 10 - hear an answer 8 3 1 12 12 1 3 - hear an answer 3 6 13 12 12 13 6 - hear an answer 5 10 13 12 12 13 10 5 - exile comes 8 3 1 12 12 1 3 8 - exile comes 3 6 13 12 12 13 6 3 - exile comes Blue yellow come relief relief come yellow blue Green purple come relief relief come purple green Purple red come relief relief come red purple Watch the exiles enter through the door.
Launch preparation
Enter the settlement and go to the opposite end of the hall from the explosive mushroom. See the shell beyond the chlorine gas and the exiles asleep in their stables.
Talk to Scurvy now that the exiles are called home. Ardan sees the shell now in the cannon. Enter shell.
Before you do the rest of the launch preparation, redo the organ puzzle for all 3 exiles to get the the creatures back to their original sentry position.
Protective shield: Place the intact protective shield on the rear porthole of the shell. Place the bolts on the holes of the shield. Use wrench on the bolts to tighten them
Other charges : Open the barrel of powder by using a wrench or the iron bar on the barrel (or cartridges) to get explosive powder. Combine a spent (red or blue) retrorocket and the explosive powder or Prulmis' explosive mixture to get a filled retrorocket. Place it on the rocket holder. Fill the other retrorocket.
Potassium: Burn raffia or dead branch on the flame in the shell to make Potassium. Do this twice.
Chlorate of Potash: Use the leak proof globe on the yellow gas from the hall close to the resting exiles to collect chlorine gas. Mix the chlorine gas in the globe with potassium to get Chlorate of potash . Borzludjak oxygenizing preparation can be used as replacement.
Return the items in Necropolis: Click on panel left of gate. Enter Necropolis. Place back the iron bar, level zero Selenite key, leak proof globe and lunar tool back on the last sarcophagus.
Exit the Necropolis: Using the panel on the right, do the math processes as before. The green is addition, red lights are subtraction, blue lights are multiplication and yellow lights are division processes.
Note: If you exit Necropolis 3 times, you will get maximum points taken from this puzzle.
| Number of points on the shapes | ||||
| 8 | 3 | 7 | 10 | 6 |
| 9 | 11 | 5 | 4 | 12 |
Level 3 key: Go back to the dignitary and press the request bell. Take level 3 key.
Contact Earth:
Gold men puzzle: Go to top floor of the settlement. Go to the gold men depicted on the wall. Insert the level 2 and level 3 key on the keyhole close to the floor. Move the limbs of the gold colored men to be similar to that of the silver colored ones below them. See the new inscription. Take the control box from the opened drawer.
Fix the mirror: Use glue on broken mirror to get mirror. Place mirror on stand at transmitter room.
Place control box behind fixed mirror.
Based on the inscription at the hall of antiquities, enter 7 for the light and 4 for fire. Watch the Morse code conversation using mirrors between Ardan and Earth.
Plant request: You can ask for supplies twice. Ask for plants to acclimate to moon environment and any other item you need.
Look for the supply canister in the plant area at the crater. Watch for smoke rising from the crater and know where the canister landed.
Use can opener to open the earth supply canister. Fix can opener using glue.
The capsule broke open and the cotton plant hybridized with the Voracia plant. Pick lunar cotton.
Tunnel of Communication painting: Combine Tunnel of Communication painting + essence of Klipsaggt and lunar cotton to get a new painting, Lumenplay in a grotto.
Lumenplay in a grotto painting: The painting holds another secret. How many times in the space of one lunar day and one lunar night does earth hide it's face? Place the twenties near the right eye, the digits near the left eye and will attain the treasure hidden in the nasal cavity of the Most High. This is referring to the clue seen under purple vision at the skull panel - one dot on the right eye and 8 on the left eye. Salt was obtained when the puzzle was completed. It also refers to the salt when the bust of the Ruler was smashed.
Launch
Cannon room: Go to the second from top level of the settlement. Go to room across the exploding mushroom. Close left door by pulling left lever. Open right door by pulling right lever.
Activate the firing of the explosives by using level 3 key on slot above the explosives.
Set timer: Go back to next room, press red arrow to point to the right to give you ample time to get to the shell. Pull down the lever to the right to start the timer.
Go to the cannon, close the porthole and wait for the launch. And away we go!
Watch the Supreme Ruler talk about taking measures before space travel becomes a habit with them.
Michel Ardan, I presume?
This document may not be distributed without express written permission of the author and the content may not be altered in any way.
For
Questions or Comments on this Walkthrough,
Please write to:
MaGtRo
Copyright © 8/2005 MaGtRo